articles/Digital/nomoredust-page3
No More Dust - part 3 of 1 2 3
Published 01/02/2011

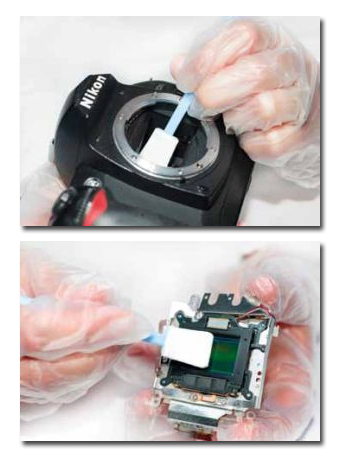
Here is the outline of how to proceed with open-shutter cleaning
1. Read through any instructions and make sure you understand them. Make sure you are not distracted and the cat is locked up, out of the way! If you wear a beard or suffer from excessively flaky skin you might consider a face mask and paper cap (that is what you would wear under clean-room conditions).
2. Fully charge your camera battery if it has less than half its charge. A battery failure during the operation can cause the shutter to close onto the swab or brush. A shutter is thousandths of an inch thick and moving at close to the speed of sound - work out the consequences for yourself! Even better, attach your camera to a power supply.
3. Locate yourself in a clean environment with relatively still air. The kitchen table is fine just as long as your partner is not sieving flour!
4. Have all necessary tools to hand.
5. Set your camera to 'manual cleaning mode' (or similarly named mode - consult your camera manual if necessary). On a Nikon (D700, D3 etc), for example, you select 'Lock mirror up for cleaning' (an option that is not available if the battery level is too low).
6. Remove any attached lenses and place your camera on its back on a flat surface, giving easy and visible access to the sensor.
7. Go through the following procedure, escalating the severity of the cleaning (and indeed the risks) if required:
a) Sensor Blower: First of all to blow it off with a Giottto Rocket. Avoid gas canisters of 'dust off'. At best they are expensive, at worst they can frost the glass in a camera or lens or, if you are really heavy handed you can actually blow the shutter clean out of the camera (we've done it, trust us!). Send several puffs of air into the camera body while the camera is facing downwards. Wait 5-10 seconds between each puff to allow any dust to settle out. This is as far as many people would wish to go and as far as your camera manual might advise. If the job is not accomplished you can pass it over to the professionals or proceed as follows at your own risk.
b) Sensor Brush: Gently place the bristled end of your brush at the edge of your camera sensor. Apply only very light pressure - much less than if one were actually painting - since sensor brushes work by electrostatically attracting dust particles to their fibres, and not by actually scrubbing these off the sensor physically. Just try to whisk away the dust. Avoid allowing the bristles to touch anything outside the sensor. There are all sorts of smudgy lubricants lurking out there!
c) Sensor Stamp: Gently press the cleaning end of this tool against your camera sensor's surface, but avoid dragging this across the surface since it can leave streaks or scratches. If the stamp area is smaller than your sensor's area, use placements that minimise the number of times it needs to be pressed against the sensor.
d) Sensor Swab: Place 2-3 drops of cleaning fluid on the tip of your tool (if it wasn't already moistening when it came). Gently place the tissue part of your tool on the edge of the sensor and drag once across the surface of the filter.
8. Turn your camera off and re-attach your lens, then take a test photo of a smooth, light surface using your lens' highest f-stop value. If dust remains, then you'll need to repeat the above steps escalating to a more aggressive tool if you have not already done so.
Societies' member, Chris Phillips has developed a cleaning kit which is one of the most competitive on the market. Called 'No More Dust' it comes with instructions but if you are not confident you can also send your camera in to Chris's workshops were it will be dealt with under controlled airflow conditions, tested and returned to you. Chris is, of course, fully insured.
Visit www.nomoredust.co.uk to see the full range of services.
As a specialist fire photographer, Chris knows a thing or two about getting cameras dirty then clean again!
Please Note:
There is more than one page for this Article.
You are currently on page 3
1st Published 01/02/2011
last update 09/12/2022 14:57:01
More Digital Articles
There are 0 days to get ready for The Society of Photographers Convention and Trade Show at The Novotel London West, Hammersmith ...
which starts on Wednesday 14th January 2026


