articles/Paper/paperprint-page1
Output Special Web Paper Print - part 1 of 1 2 3 4 5
by Mike McNamee Published 01/10/2002

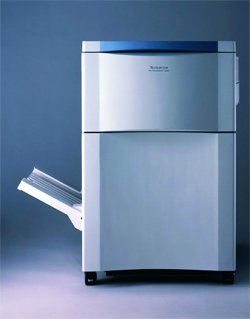
We have for some time now been examining the output from a variety of Fuji Pictrography printers (we'll call them PG's for short, we are not sure what the plural is!). We should declare an interest from the outset - SWPP sells them and also has one in the office! In case we are accused of bias we should state that our analysis is based on measurement as well as visual assessment and that the writer had a healthy regard for the printer for some years before the Society started to sell them! The present look at PG's covers the PG3000, 3500, 4000 and 4000II. Significantly it also includes the upgraded printer driver which is a big step forward in user friendliness. In total we have looked at eight printers, bespoke profiling four at the time of writing.
The Concept
The Pictrography series are freestanding digital printers in two sizes, A4 and oversized A3. They look like medium sized photocopiers. They are "photographic" in nature. Exposure is made through laser diodes onto a donor media and the dyes are then transferred by the addition of a few drops of distilled water onto a receptor paper before thermal developing takes place. This process happens at relatively high speed and a full A3 print will emerge in around 90 seconds, just under a minute for repeat prints.
The options for paper include gloss, lustre, lightweight and OHP.
The paper width may be varied so that a range of sizes may be printed off one roll. You do have to change roll though if you wish to change format to a larger or smaller size. A roll of media will produce between 140 and 180 prints depending on size and thickness and the machine can happily be left to do its work unattended. It needs a drink of distilled water now and again but that is the only thing that has to be added apart from the rolls of media.

Printer Performance
Output from PG's has the look and feel of a conventional photograph and rarely causes comment from the punter - they just assume it is a photograph. The most usual comment from a professional photographer viewing the print is about the cleanliness of the greys and neutrals. This is due largely to the gizmo on top of the unit, the calibrator. To use this you print a set of swatches and feed them through the calibrator whichthen "linearises" the output. As well as ensuring consistent reproduction from day to day this seems to be key in the even tone bias of the neutrals and near neutral colours. Even though the greys scale might be a little off neutral, the observer accepts the colour because the tone does not waver down the density range in the way the desktop inkjet frequently does.
Our general finding (although not every single case) has been that the output is slightly reduced in saturation when using default settings. This actually has the advantage that a slight error in the skin tones from the input (camera) end is masked. A bye-product is therefore slightly more latitude for the camera work, although the saturation may be easily increased in the colour control dialogue on top of the machine (see also the comments on the new printer drivers).
You are currently on page 1
- Output Special Web Paper Print page 1
- Output Special Web Paper Print page 2
- Output Special Web Paper Print page 3
- Output Special Web Paper Print page 4
- Output Special Web Paper Print page 5
1st Published 01/10/2002
last update 09/12/2022 14:57:20
More Paper Articles
There are 0 days to get ready for The Society of Photographers Convention and Trade Show at The Novotel London West, Hammersmith ...
which starts on Wednesday 14th January 2026


