


articles/Lighting/part35-page3
by Dave Montizambert Published 02/02/2015
5
To unlock the magic of Frequency Separation you need to geek out for a bitand follow my recipe below.
-With an 8bit image file open in Photoshop, duplicate the background layer by typing Cmd/CtrlJ (I notate the first modifier key for Mac users and the second modifier key after the forward slash symbol for Windows users).
-Name this duplicate layer 'Detail & Texture', this will be the top layer of the layer stack - the highfrequency layer - click on this layer's visibility eyeball to temporarily turn its visibility off.
-Rename the Background layer to 'Colour & Tone', this will be the lowfrequency layer.
-Right click on the Colour & Tone layer and select 'Convert to Smart Object'.
-With the Colour & Tone bottom layer still selected, go to the Filter menu and select: Blur > Guassian Blur > Radius: 2.0 pixels (that's the amount I like to use). The result you are looking for is a radius that lightly blurs all the fine detail.-Type Cmd/CtrlShift-N to create a blank new layer above the bottom layer, name it 'Retouch Colour & Tone'.
-Select the Detail & Texture layer (the top layer) and click on its visibility eyeball to turn on its visibility.
-From Image menu select 'Apply Image...'.
6
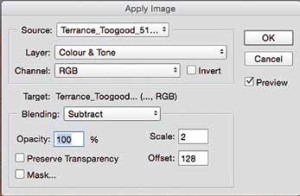
-In the resulting Apply Image window (see Image_05), Photoshop will have automatically chosen the file you are working on, so its name should appear in the 'Source' field.
-Set the 'Layer' field to the bottom original layer now called Colour & Tone (this will apply the Detail & Texture layer to this layer).-Set the 'Channel' field to RGB.
-The 'Invert' checkbox should be unselected.
-Set the 'Blending' field to Subtract.
-Set the 'Opacity' field to 100%.
-Set the 'Scale' field to 2.
-Set the 'Offset' field to 128.
-The 'Preserve Transparency' and 'Mask...' checkboxes should be unselected.
-Click the 'OK' button to apply the 'Apply Image' settings to your image, you now have detail & texture separate from colour and tone, although the image now looks like a weird grey line drawing.
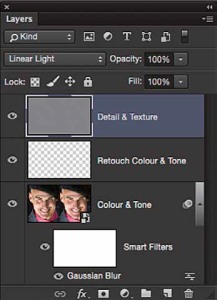
-With the Detail and Texture layer still selected, go to the top left corner of the Layers Palette then click on the Blend Mode field (which by default reads Normal) and set it to 'Linear Light'. Notice how your weird grey image now looks normal again, only now it is sharp again. To see what the final layer stack should look like see Image_06.
-The next step is to smooth the subject's skin-tone, ie make wrinkles less dark and so less noticeable, or tone down 'glare' areas.


SWPP - Society of Wedding and Portrait Photographers
The Society of Photographers
Clwyd Chambers, Clwyd Street, Rhyl, Denbighshire, LL18 3LA, UK
Tel 00 44 (0) 1745 356935
Home Page - Find a Photographer - Benefits of Membership - Events and Seminars - Who's who - Photographic Trade Directory - About - Qualification Structure - Mentor Me Programme - Professional Imagemaker Magazine Articles - FREE information pack - Privacy