


articles/Photoshop/perfectpublicity-page3
Published 01/07/2001

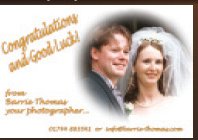
5. To complete the card I needed more white space to the left of the image. Using Image > Canvas Size I clicked to the right of the central active square in the grid to move the original photo to the right-hand edge and then doubled the width. This extended the card to allow for the typed in straight and then resized and reshaped using the Edit> Transform tools; you can get away with this because in Photoshop 6 the text is vector based and therefore resizes without any loss of quality, as long as it remains un-rasterised on its own layer.
Drop-Shadow and Emboss effects were added to the basic text, using the Layer Styles dialogue box. The remaining text was added and then made to look the same by using Copy Layer Style and Paste Layer Style.
The whole exercise would probably have taken about five minutes but of course it doesn't have to be done every time; you simply save it, and a few others for variety, onto the hard-disk and then change the photo each time.


SWPP - Society of Wedding and Portrait Photographers
The Society of Photographers
Clwyd Chambers, Clwyd Street, Rhyl, Denbighshire, LL18 3LA, UK
Tel 00 44 (0) 1745 356935
Home Page - Find a Photographer - Benefits of Membership - Events and Seminars - Who's who - Photographic Trade Directory - About - Qualification Structure - Mentor Me Programme - Professional Imagemaker Magazine Articles - FREE information pack - Privacy