


articles/Photoshop/photoshopfeaturescount-page3
by Mike McNamee Published 01/06/2010
Feature Number 5.
Round Trip Workflow. For those times when you absolutely must use Photoshop, Round Trip Workflow is a quick and easy way to send an image to Photoshop, save it, and then have it come back into Lightroom - all without the hassle of going through the Save-As dialogue. Utilising Round Trip Workflow will also help minimise file loss, and help keep your digital assets organise.
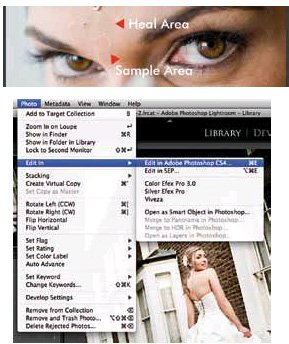
1. Select the image to be edited in Photoshop.
2. From the menu, select Photo > Edit In Photoshop CS4 (can also get this option by right clicking on the file)
3. The images will automatically launch in Photoshop CS4, either as a PSD or TIFF (depending on your Lightroom preferences set-up under the External Editor tab).
4. Once you are finished with Photoshop, just save and close the file. Your PSD or TIFF file will now magically reappear back in Lightroom, right next to (and in the same file) where the original RAW file resides.
To re-edit a Lightroom-saved Layered PSD or Tiff image in Photoshop
1. Select the PSD or TIFF image to be edited in Photoshop.
2. Select the 'Photo' menu > Edit In > Photoshop CS4.
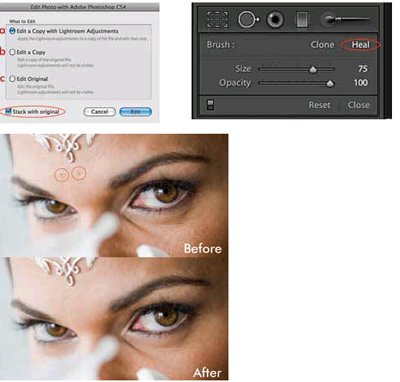
3. A service dialogue will pop up with the following editing options:
a. Edit a Copy with Lightroom Adjustments - any adjustments made to the Layered PSD or TIFF in Lightroom will be applied to a new flatten PSD file that will open in Photoshop.
b. Edit a Copy- this option will flatten the original PSD or TIFF; however, any adjustments made to the file in Lightroom will not be applied.
c. Edit Original (the most commonly used and easiest choice) - with this option, the original layered PSD or TIFF will open in Photoshop 'as-is' while retaining all associated Layers.
Note - If you select option a or b, it is a good idea to check the 'Stack with Original' option at the bottom of the dialog; this option will ensure the new PSD or TIFF is saved right next to the original RAW as a stack.
4. Once an option is selected, click on 'Edit' to open the image in Photoshop.
5. When finished editing, simply save and close the file. It will automatically return to Lightroom.
Feature Number 4.
HSL - Hue Saturation Luminance Slider. The Hue Saturation Luminance panel is located within the Development Module on the Right Panel. This tool's advantage is the ability to target a specific colour and either change its hue, saturation, or luminance; or perform all three in combination at the same time. Here are a few ways this tool can be used with weddings and portraiture.
One common drawback however, is that the colour temperature in open shade is much higher in comparison to those areas in direct sunlight. This causes most of the white bridal gown to take on a blue cast (commonly caused by the fluorescent in the fabric, used to give the dress its sheen). Before Hue Saturation Luminance, getting rid of this colour cast would require using Curves and Masks in Photoshop. Now it can be done quickly in Lightroom, and better yet, right on the RAW file.


SWPP - Society of Wedding and Portrait Photographers
The Society of Photographers
Clwyd Chambers, Clwyd Street, Rhyl, Denbighshire, LL18 3LA, UK
Tel 00 44 (0) 1745 356935
Home Page - Find a Photographer - Benefits of Membership - Events and Seminars - Who's who - Photographic Trade Directory - About - Qualification Structure - Mentor Me Programme - Professional Imagemaker Magazine Articles - FREE information pack - Privacy