


articles/Photoshop/photoshopfeaturescount-page5
by Mike McNamee Published 01/06/2010
The first adjustment will be made to the skin's tone, to brighten it.
1. Move the Targeted Adjustment Tool over the cheek or forehead area of the groom.
2. Click and hold, then move the mouse upward to increase the luminance of the skin tone; brighten it to taste.
The second adjustment will be made in the sky area to darken it.
1. Move the Targeted Adjustment Tool over the area of the sky.
2. Click and hold, then move the mouse downward to decrease the luminance of the blue sky, which corresponds to the blue channel.
Be extra careful when doing these types of adjustments to large areas, such as the sky, for there exists an increased risk of edge banding and posterisation.
Feature Number 2
Development Module Preset. There are numerous presets out there for Lightroom available via download from the Internet. While many of these are free, many are not. Creating your own unique preset to suit your workflow is not difficult, but there are some tricks to properly creating a good and usable one. Let's learn how.
To create a preset, you need to break down into steps the effect you are trying to achieve. For instance, let's say you like the black and white look from Tip Number 3 and want to create a preset so you can apply the same adjustments on other images, any time you want.
To start:
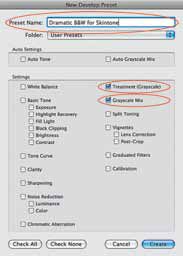
1. On left panel of the Development Module, look for the Preset Panel, then click on the plus sign to create a new preset.
2. Give the preset a name. In this case, I named it, 'Dramatic B&W for Skin Tone'.
You'll find under the Setting section many adjustments options to select from. At this point, the adjustments or treatments applied to an image are identified. In this case the Treatment (Greyscale) and the Greyscale Mix treatments were applied.
3. Check the Treatment (Greyscale) and the Grayscale Mix box, and leave all other boxes unchecked.
Note: To combine several different effects together, simply select them from here. For instance, to add a lens vignette to your 'Dramatic B&W for Skin Tone' preset, just select the Vignettes Box. Keep in mind that it is a good idea to keep your presets simple - don't combine more than three or four adjustments together.
4. Click on Create. Your new preset 'Dramatic B&W for Skin tone' now appears in the User Presets folder the Preset Panel.
5. To apply this preset to another image, simply select the image, then click on the preset name to apply it, and voila! You are done!
Feature Number 1
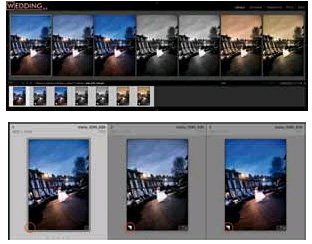
Virtual Copy. In my opinion, this is by far the best feature in Lightroom, especially for the wedding and portrait photographer. What exactly is Virtual Copy? It is the ability to apply multiple treatments to a single RAW image. For instance, let's say you like the original look of a particular wedding image, but you also want to create other versions of the same image (maybe de-saturated colour, saturated colour, black and white infrared and sepia). Lightroom's Virtual Copy feature allows you to apply each of the treatments above, without having to duplicate the RAW file multiple times, or having to deal with increased storage issues.
Here's how you do it.
1. Highlight the image.
2. Go to the menu Photo > Create Virtual Copy. Short-cut key MAC - Command + Apostrophe (') WIN - Control + Apostrophe (')
3. Boom! You are done! Now you will see two of the same image side by side in your filmstrip. You can now work on the Virtual Copy just as you would any other image.
4. To create additional Virtual Copies, or make a Virtual Copy of a Virtual Copy, just repeat step 2.
5. A folded corner on the bottom left of a thumbnail image in the Filmstrip or on the Grid is your sign that the image is a Virtual Copy.
That's it!
These are the 10 tips that I believe makes Lightroom a great program, designed specifically for the way wedding and portrait photographers work! However, please keep in mind that there is so much more to this powerful and flexible program.
I strongly encourage you to use these tips as a springboard to experiment and explore, as you seek new heights for business and your craft. In addition to these tips, you may also visit our website Rule of 3Rds at www.Ro3Rds.com to learn more about Lightroom utilising our screen cast (recording). And check out our new Lightroom Tutorial DVDs called TOSCA on Rule of 3Rds website as well. You can get a 30% discount by quoting the code SWPPTOSCA on all products.


SWPP - Society of Wedding and Portrait Photographers
The Society of Photographers
Clwyd Chambers, Clwyd Street, Rhyl, Denbighshire, LL18 3LA, UK
Tel 00 44 (0) 1745 356935
Home Page - Find a Photographer - Benefits of Membership - Events and Seminars - Who's who - Photographic Trade Directory - About - Qualification Structure - Mentor Me Programme - Professional Imagemaker Magazine Articles - FREE information pack - Privacy