


articles/Photoshop/photoshopimpressions-page3
by Dave Montizambert Published 01/06/2005
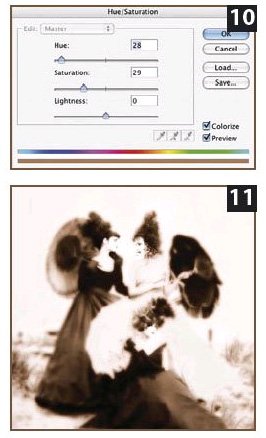
Parasol Gossip was captured on B&W Polaroid so it is a B&W image. However, the scanner scans the image in RGB colour space making it a monochrome colour image. Since the image is already in RGB colour space it is a very simple matter to colourize it so that it looks like a Sepia Tone. The brown tone Sepia effect we see on [11] on is created with a Hue and Saturation Adjustment Layer in Adobe Photoshop. Click on the Create New Fill or Adjustment Layer icon at the bottom of the Layers Palette - the half black half white circle. Select Hue/Saturation from the pop up menu (the New Adjustment Layers' menu is accessed in pre-6.0 Adobe Photoshop by clicking on the arrow head located near the top right corner of the Layers Palette). In the resulting dialogue box click inside the Colorize box on the bottom right side of the Hue/Saturation dialogue box to select Colorize. Make sure the Preview is selected also. Now drag the Hue slider to the left until the image is Colorized with brown. If the Colourizing is too saturated, slide the Saturation slider to the left. See [10] on to see my settings. If sepia is not your cup of tea, try other Hue and Saturation settings. Blue toning can be easily mimicked using the Hue and Saturation controls too.
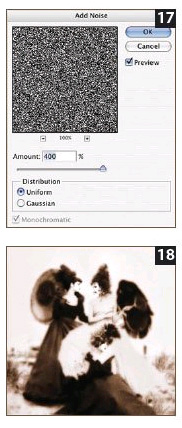
The finishing touch added to Parasol Gossip is film grain. As discussed earlier, digital captures from digital cameras have no film grain. This is an advantage for most image creation however if you purposely want a grainy looking image you need to mimic film grain with a Noise filter. To add Noise to the image in Adobe Photoshop, first select the layer you want to add the effect to then select Filter > Noise > Add Noise. Zoom in to 100% then drag the Amount slider until the desired amount of grain effect is achieved. Depending on your tastes select either Uniform or Gaussian for Distribution and select Monochrome. If you leave Monochrome unselected the noise pixels will be coloured red, green, or blue. To my eye this looks fake.
The Amount slider controls the intensity of the individual noise pixels, that is to say, how bright or dark the contrasting noise pixels are. To print a photograph on paper with a printing press the image must first be broken down into dots. This transformation from continuous tone to a dot pattern is called applying a line screen. A 150-line screen will break the image down into 150 dots per inch. When supplying digital images for printing on a printing press, set the resolution (the pixels per inch or ppi) of your files to 1.5 to 2 times the line screen ruling. A 150-line screen requires an image resolution of 225 to 300 ppi (1.5 or 2 x 150) at the final dimensions of the image.
In Adobe Photoshop the controls for this are under the Image menu under Image Size.
Applying a line screen to an image tends to hide noise and film grain. A low line screen ruling hides noise and film grain more than a high line screen.
Usually this is a bonus since in most cases noise and film grain are unwanted.


SWPP - Society of Wedding and Portrait Photographers
The Society of Photographers
Clwyd Chambers, Clwyd Street, Rhyl, Denbighshire, LL18 3LA, UK
Tel 00 44 (0) 1745 356935
Home Page - Find a Photographer - Benefits of Membership - Events and Seminars - Who's who - Photographic Trade Directory - About - Qualification Structure - Mentor Me Programme - Professional Imagemaker Magazine Articles - FREE information pack - Privacy