articles/Photoshop/retouchornottoretouch-page3
To Retouch or Not to Retouch - part 3 of 1 2 3 4 5
by Christina Lauder Published 06/06/2012

I follow this by slimming the face down a little. To do this I start with the freeze mask tool in order to ensure that my facial features remain as they should. I didn't want to change my features, just remove a little from my cheeks and below my chin. At the end of the day I still needed to look like me. The screen capture below shows the Liquify tool in action (which can be found in the Filter menu).
Once I have frozen the main part of my face I would then use the forward warp tool to push in the unwanted areas and basically slim down my face. I did this to both cheeks and beneath my chin. I also applied this technique a little to my waist.
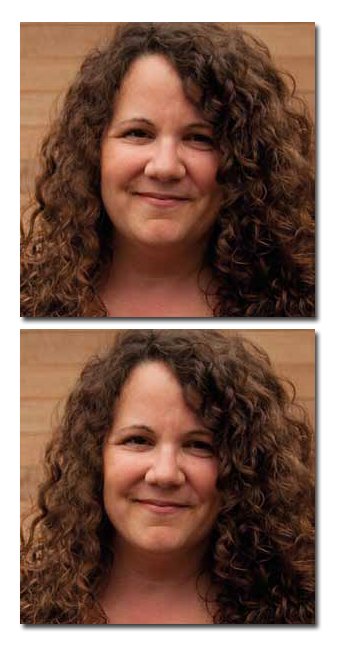
(For those of you who don't know which tools are which just hold your cursor over the tools and it will tell you.) Below is a copy of both before Liquify was applied and after. blemishes. This is where I would go over the image with a fine-tooth comb. (Please note that this degree of retouching is only done for final images and not images I show in viewings - although I do include one or two of my favourites fully retouched so they can see what to expect.)
Here I would remove any blemishes that don't belong at all. This includes spots, scratches, stray hairs, etc. This wouldn't include scars unless specifically asked by the client. Nor would this include wrinkles or laugh lines. This will be done in the next stage. To do this I use the patch tool or spot removal tool.

Once this is done I then create a duplicate layer. (I often create duplicate layers throughout this process but how many times you choose to duplicate layers is up to you. I like the option of going back and seeing the starting image and being able to go back at point to start again if necessary).
Then I go over the image again removing all wrinkles, laugh lines, bags under the eyes and anything else that I find too harsh for the final image. You might find this looks odd. And it does. This is why the final step to this stage of enhancements is to reduce the opacity of this layer.
We want to bring some of the natural lines back into the image (this is why it is important to start with a fresh duplicate layer). The degree of which will be personal taste. I would probably say 50% is a good amount though: Here is my after image for this stage:
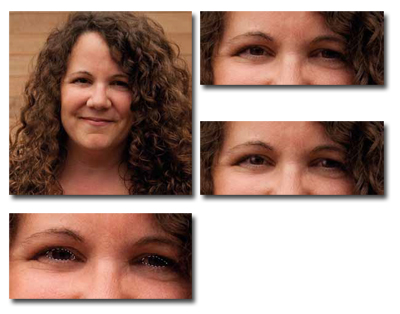
Next I like to work on the eyes. I almost always want to brighten up the eyes a little. This is a very simple step but to me makes a big improvement. Start by selecting the eyes using the Lasso tool (see below) and feather your selection. The amount feather will depend on how large the eyes are within your image.
Then add a curves layer. This will automatically apply a mask so that you are only affecting your selection. Select a point in the white quadrant of the curve and push it upwards until the eyes look bright enough but still look natural.you
Please Note:
There is more than one page for this Article.
You are currently on page 3
- To Retouch or Not to Retouch page 1
- To Retouch or Not to Retouch page 2
- To Retouch or Not to Retouch page 3
- To Retouch or Not to Retouch page 4
- To Retouch or Not to Retouch page 5
1st Published 06/06/2012
last update 09/12/2022 14:58:34
More Photoshop Articles


