articles/Lightroom/skintune-page2
Skin Tune - part 2 of 1 2
by Mike McNamee Published 01/04/2007

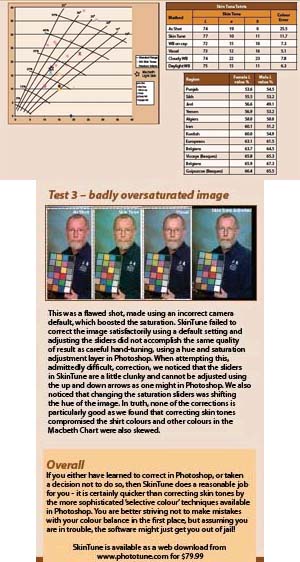
In the composite image shown, the as-shot rendering is shown in the top left. The camera was set to Auto White Balance and has been completely fooled, by the expanse of green, into over-correcting towards the complementary colour - magenta. The other five shots are the renderings produced by different correction methods and the table plots the error in the colour components of hue and saturation, compared to a reference colour of the Macbeth Light Skin Swatch. This is slightly flawed because our model, Jon, might not be true Macbeth Skin coloured but he has a reasonably 'average' sort of skin complexion. In a nutshell, the error, to start with, was 25.5 points (Lab Delta E) and we halved it using a single click of the mouse in SkinTune. However, it was not as accurate as using either default 'daylight' or 'cloudy' white balances in Adobe Camera RAW, and the best result was still a visually adjusted rendering on a calibrated monitor. Click balancing on the subject's cap did a reasonable job, but the cap was not a neutral grey so it left some residual bias. The graph plot shows where the skin tones ended up on our own plot of commonly found skin tones. Most of the methods left the skin slightly red and slightly desaturated.

Test 2 - baby skin too blue
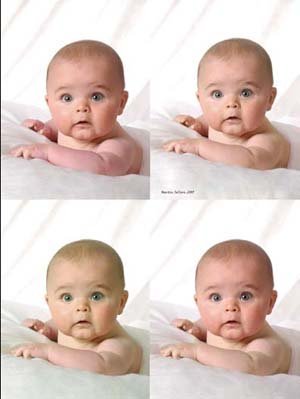
This is a problem we have discussed before in Professional Imagemaker. Babies are inherently pinker than adults as the melanin has not had a chance to acquire a 'tan' from the sun. However, because the baby skin is so translucent, and the paler melanin is not blocking out the underlying skin structure, the blue, venous blood can present the little darlings with rather ugly, blue arms. In the baby image shown, by member Martin Sellars, the facial tones are correct, the arms blue. Correcting the entire image using SkinTune left the baby's face too yellow (the complementary of blue) and the quilt had taken on an ugly cast. The solution, shown in the lower right, was to use SkinTune on a duplicate layer (to correct the arm) and then mask out the over-yellow part of the image. The result compares quite well to a handcorrected attempt shown in the upper right, which also took some of the pink out of the baby. There is a common tendency for digital cameras to emphasise skin tones a bit on the red side.
Please Note:
There is more than one page for this Article.
You are currently on page 2 Contact Mike McNamee
1st Published 01/04/2007
last update 09/12/2022 14:59:00
More Lightroom Articles


