


articles/Lighting/splashtheflash-page3
by Terry Donnelly Published 01/04/2017
5
Next I use a device called a ‘Camranger’ which is a wireless camera control unit, that connects to the camera via a lead, and to an iPad, MacBook or iPhone wirelessly. The Camranger enables me to control and fire the camera remotely from one of these devices via the Camranger app, and also provides me with a live view, and near instantaneous preview of the photograph taken. It is transmitted live to my device or laptop, or both. The Camranger is a great device, for speeding up my ‘splash the flash’ technique, and also for allowing clients to receive and view the pictures being taken live on their connected iPhone or iPad.
Next I need to make a connection between the camera, and the offcamera flash, and for this I use a remote trigger system to provide a radio link between the camera and the flash unit.
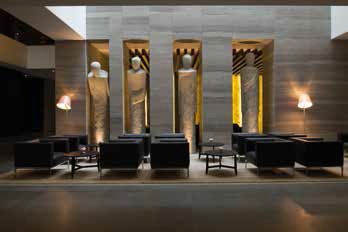
The light coming from the windows above the seating area is bright, but falls off quickly towards the seating area. Looking at the seating area, I can see that it needed to be lit with flash to add atmosphere and detail in the seating. We could simply fire a burst of light across the whole of the seating area but that would lighten the area up and would look un-natural and ‘flashy’ – and we don’t want that, we want the photograph to look as natural as possible, and as if it is purely lit by the ambient light from above, and the floor lamps, as seen in the picture. The flash light I was introducing needed to be controlled and funneled into the darker areas to bring out texture and detail in the seating and wall areas.
I then decide what lighting equipment I would use. I have in my kit a range of lighting equipment, including speed-lights, hybrid batterypowered studio lamps and mains-powered studio lamps. For the picture shown I decided to use a single speed-light. We were bringing a lot of ambient into the picture, and it didn’t require a lot of flash output to light the areas of interest, because we weren’t trying to overcome the ambient, we were using the flash in conjunction with the ambient, to supplement and light the areas with fill light. We were also close to the areas to be lit, which allowed us to use much lower power settings than if we were some distance away.
I controlled the direction and spread of the light from the flash by fitting a grid to the flash unit. A grid in lighting terms is a honeycomb-like structure that only allows light to travel in a forward direction, and stops the light spreading out as it leaves the flash unit. The grid gives control and direction to the light and prevents spill. It allows me to put the light exactly where I want it to be.
Depending on the scene to be lit and amount of ambient light I want to allow, or restrict, will depict the type of flash unit I will choose to use and type of grid. For this particular picture, I chose to use a speed-light with a grid attached to the front. I will only use speed-lights if I can get enough light from them at ¼ power, or occasionally ½ power. Firing the speedlights at lower power means that they will recycle much more quickly, and be less demanding on batteries. This is important when working in areas that other people are in, and particularly if the client is watching the shoot unfold on a tethered laptop or iPad. The client will not want to be waiting around while speed-lights recycle once they have been fired at full power, which can typically take several seconds or longer.


SWPP - Society of Wedding and Portrait Photographers
The Society of Photographers
Clwyd Chambers, Clwyd Street, Rhyl, Denbighshire, LL18 3LA, UK
Tel 00 44 (0) 1745 356935
Home Page - Find a Photographer - Benefits of Membership - Events and Seminars - Who's who - Photographic Trade Directory - About - Qualification Structure - Mentor Me Programme - Professional Imagemaker Magazine Articles - FREE information pack - Privacy