


articles/Lighting/splashtheflash-page4
by Terry Donnelly Published 01/04/2017
4
Working the flash in small areas at a time, I point the speed-light towards the area I want to splash the light in, and fire the camera from the remote shutter available on the iPad via the Camranger software. As the shutter opens on the camera, the hot-shoe-mounted radio trigger sends a signal to the off-camera speed-light I am holding, and fires the speed-light. A copy of the photograph is then transmitted by the Camranger to my iPad and other connected devices, giving me instant feedback without having to return to the camera, which could be some distance away. This saves a lot of time, and allows me to adjust the angle and distance of the speed-light from the subject (and hence spread of light) and power of the speed-light for the next shot. This procedure is repeated around the set until I have lit all the areas of interest with the speed-light in multiple photographs.
The photographs are then loaded as layers in Photoshop, and blended using layer blending modes and masks to make a final image from all the layers. This may initially sound like a complicated task in Photoshop, but by changing the layer blending mode to Lighten and using masks to hide areas on the layer we don’t want to show, it is an extremely fast and effective method of finalising the picture.
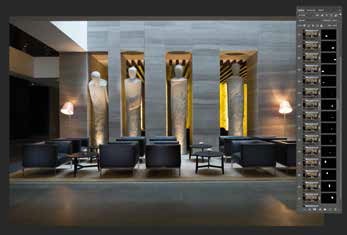
By changing the layers blending mode to Lighten, it only shows the lighter pixels on the layer when compared to the layer below. In other words, it only shows the area affected by the flash. The Lighten blend mode looks at the colour information on the current layer and the layer below, and shows the lighter of the pixel information on those two layers, and thus allows the lighter area (the results of the flash) to be shown. By adding a layer mask to this layer, we can then limit and control the spread and brightness of the lighter areas and finesse the result buy using the opacity slider and a softedged brush to add to the layer mask and hide or reveal various parts of that layer (including me holding the flash unit) [image 4]. This procedure is repeated for all the additional layers, containing the results of using the flash on different areas of the set.
The final image was then cropped, some cloning, colour adjustment and tidying up carried out to finalise the image as shown.
On this particular job, I was shooting between 12 and 14 sets per day, and my ‘Splash the Flash’ technique allowed for a fast workflow, with minimal equipment, which ensured an effective way of lighting a large set in a public area, with the ability to move quickly and having the bonus of having less equipment to be moved around.
The ‘Splash the Flash’ technique may be offered as a workshop at the next Convention in 2018 if you would like to learn this technique hands on.


SWPP - Society of Wedding and Portrait Photographers
The Society of Photographers
Clwyd Chambers, Clwyd Street, Rhyl, Denbighshire, LL18 3LA, UK
Tel 00 44 (0) 1745 356935
Home Page - Find a Photographer - Benefits of Membership - Events and Seminars - Who's who - Photographic Trade Directory - About - Qualification Structure - Mentor Me Programme - Professional Imagemaker Magazine Articles - FREE information pack - Privacy