


articles/Photoshop/adobelightroom-page1
by Mike McNamee Published 01/02/2007
Time for an admission! After trying a number of image processing applications we had become a little weary of them. They all promised great things but delivered roughly the same result, in roughly the same time. The additional learning curve for swithcing workflow with remnants of other methods lurking, meant that we had stuck conservatively to Adobe Bridge. Some of the software we have tried was a little faster, some were a pain, some were downright dangerous, crippling existing file associations and seemingly disembowelling Adobe Camera RAW. Adobe Lightroom had fallen foul of this attitude but we took the opportunity at the recent Nikon Expo to sit down with one of the Adobe people and have a run through. This turned out to be quite a revelation and although we shall be sticking with Adobe Bridge ourselves, our advice is that pure photographers should take a long hard look at Lightroom and see if it is useful to their workflow.
Lightroom is a freestanding utility for managing digital files. It is presently available as a free, public beta copy. Without moving out of the software you can carry out sophisticated colour and tone-balancing corrections, send files to print as pages or contact sheets, make slide shows or build web pages. It can process camera RAW files alongside the usual image types such as JPEG, TIFF and PSD. The key feature in the Develop module of the program is the ability to effect RAW-like corrections on non-RAW files - hence you can tweak colour temperature and tint if you have not shot at the ideal white balance. Just such a situation had arisen for member, Martin Sellars who has kindly allowed us to reprocess his originals. Some of these had been shot with the 'incorrect' white balance and had originally been laboriously corrected in Photoshop. The advantage of Lightroom was immediately evident, click balancing for neutrality on the bride's dress applied correction to both colour temperature and tint to effect an extremelyLightroom Tools rapid and accurate adjustment.
There are five main tabs available for the user: Library, Develop, Slideshow, Print and Web. We will cover them in sequence.
Library
This is where you manage your files. They may be allocated to sets (shoots) and browsed at speed. Lightboxes of files may be viewed or they may be viewed one at a time and cycled through via the filmstrip at the bottom. Really useful is the ability to 'compare'. Using the shortcut 'c' you are able to pull as many images as you choose from the filmstrip so that you may select the best one - ideal in group shots if you are eliminating blinkers.
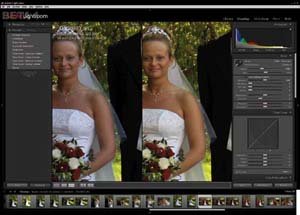
Develop
It is the Develop dialogue box, which provides some of the controls of RAW file handling that were not previously available for other file formats. The composite screen-grab shows the elongated Develop palette listing. It includes selective colour adjustments for the primary and secondary colours, making selective desaturation of the occasional over-red face much easier. The only thing missing is an ability to mask an image for area-selective adjustments. The length of the sliders (and hence the sensitivity) may be varied by pulling the vertical divider to the left. To assist accurate viewing, the dialogue box may be cycled through full screen, dimmed and lights out modes (see image).
When setting the white point using the white balance eyedropper, the effect upon the neutrality of, for example, the wedding dress may be assessed in the RGB values reported at the base of the screen. This is scaled in per cent (only) - it would have been nice to have had other measuring parameters, some of us just don't like assessing colour in RGB parameters. An interesting observation we made was that neutralising the wedding dress with the eyedropper did not create a truly neutral white on all occasions. Originally a bug was reported with D2X files and we are not sure if this was the same problem.

The control of the curves is very slick indeed. The four zones (Highlights, Lights, Darks, Shadows) are all marked on the curve itself and moving the corresponding slider only adjusts that part of the curve. It works very well indeed.
The one control we found to be spectacularly poor was the Auto Adjust Tonality - treat this with extreme caution!
Fringe reduction is available in non-RAW files, quite a bonus. As with Bridge and ACR this allows the user to adjust for chromatic aberration fringing in the vicinity of bright to dark transitions.
Finally, we expected the rendering to be identical from both Lightroom and Adobe Camera RAW - it is, but was worth confirming. We simply created TIFF files under the same conditions and compared their colours.


SWPP - Society of Wedding and Portrait Photographers
The Society of Photographers
Clwyd Chambers, Clwyd Street, Rhyl, Denbighshire, LL18 3LA, UK
Tel 00 44 (0) 1745 356935
Home Page - Find a Photographer - Benefits of Membership - Events and Seminars - Who's who - Photographic Trade Directory - About - Qualification Structure - Mentor Me Programme - Professional Imagemaker Magazine Articles - FREE information pack - Privacy