


articles/Photoshop/adobelightroom-page4
by Mike McNamee Published 01/02/2007
There is a new Curves palette in which both curves and the histogram are displayed. A clipping display for both highlight and shadows is available (from the short-cut 'w') and it switches, depending on which end of the scale you click the mouse.
Black and White
Adobe have obviously noticed that their users spend hours devising ways of converting colour to monochrome. Indeed, Professional Imagemaker ran 44 pages on the subject some 10 months ago. The main requirement is to control the way that different hues translate to luminosity values in the final image. In traditional photography this is accomplished with colour complementary filters (orange, red, yellow, green, etc). Channel mixing in Photoshop controls the effect in the same way (give or take a few wavelengths) but you have to be able to guess how much red, green or blue to add to make, say, an orange.
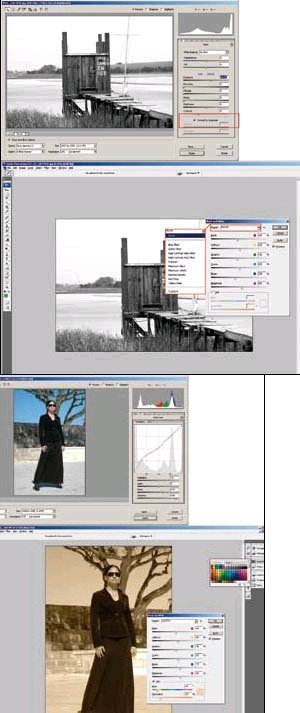
There are two major routes to monochrome starting with a RAW file. From ACR you can click the monochrome option and adjust the tone curves and other controls to give you the effect you desire. This has the advantage that you can migrate to Photoshop with a 16-bit file.
From within Photoshop with either a RAW file or JPEG file you may now click Image>Adjust>Black and White to reveal the new dialogue box with its control over luminance contributions from the various primary and secondary colours. We note that there are no tertiary colours such as orange in either the sliders or the presets. There is, however an Infrared option and a very useful 'Tint' option. If overall contrast tweaks are required, it is probably best to make them as you process the Raw file - failing that you have to use curves and levels on the processed file.
In this shot of Annabel, the dark details of her skirt have been recovered with a 'Shadows' and 'Darks' adjustment before transfer to Photoshop CS3 and the Black and White adjusted. Here the blue sky was balanced in tone to the paving with the blue slider before using 'tint' to apply the sepia. The rather ugly, bright stonework to the model's left could be toned down by reducing the contribution from the yellows, although it remained posterised.
The Black and White may be applied as an Adjustment Layer to give you area control for mixed colour/mono composites.
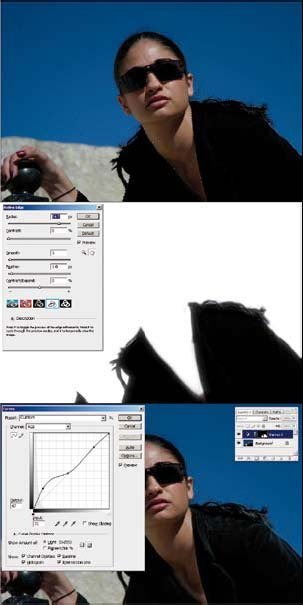
Quick Selections
his tool now takes precedence over the Magic Wand tool in the Tool Bar itself. You drag the Quick Select tool over an area you wish to select and it makes a pretty reasonable guess at what you are trying to do. The magic comes from the 'refine edges' dialogue. From here the Radius expands the selected area into the wispy hair on the model's shoulder. The methodology mimics the choking and clamping technique used on Layer Masks using the levels dialogue, but it is neater to use for those needing to work at speed or perhaps with less experience. Time and many dozens of attempts will be needed to refine our view of this tool but so far it looks really excellent. We tested the tool further by going back to an old image, activating a Layer Mask into a selection and then applying the Refine Edges command (yes you can - how cute is that?). This was a very impressive display, especially as we had already used the advanced choking techniques first.
Photomerge
his is an improved merging engine which has benefited from the work done for the auto-align feature. The image shown comprised a panoramic of seven Photoshop files each of 16MB, to create the final 110MB file, reproduced here. At inkjet printer resolution this would make a 1.2 metre-wide image. The quality of the joins was flawless and certainly a spectacular demonstration of the photo merge capabilities with this type of image-set.
An attempt at a 12-image stitch covering a full 360° panorama came off with just a little jog in the ceiling line. This was a particularly tricky stitch to make with other stitching software and so was quite impressive as well.
A 360° immersive stitch proved to be beyond the program's capabilities and it crashed in the attempt.
Auto Align
Now and again the developers of programs conjure up some magic. For CS3 it is the new Auto-Align Layers feature, which is part of the Edit sub-menu. If you shoot wedding groups you will love this one. A clever scientist at CSIRO, Dr Piers Barnes, recently modelled the effect for groups of people. The bottom line is that if you have a group of 15 people in good light, you have to shoot 15 frames to be 99% certain that you have at least one blinker-free image. Once you get past 50 people forget it - your chances of success are vanishingly small. Auto-Align comes to the rescue. With CS3 you take two shots in quick succession and place them on separate layers. Then you select the layers and click Auto-Align and, by magic, the content is analysed and the layers are lined up, faces on faces. All you now need do is make a layer mask and bring the non-blinkers to the fore - easy peasy!
Print Dialogue
The old 'Print with Preview' has gone. Now, when you click to print, a colour-managed preview pops up and from there you may choose your printer model, change the page orientation and scale, along with all the other options that have always been available. Clicking the 'Match Print Colours' is new and provides both a paper- and print-colour simulation - our example for the creamy DuPont digital proofing paper is coloured, just like the actual paper, driven from the base white data of the profile. In our tests there was a slight glitch on the refresh of the page size routine, which presumably will be sorted for the final version. The switch from Landscape to Portrait orientation is now controlled by a button beneath the preview, which is slightly quicker than the old, two-pane system.
Overall
After a two-year wait we have a stepwise jump for the Mac user, but a smaller number of tangible benefits for the PC user. However, the new features contain some fairly beefy stuff, which would easily justify the upgrade cost. If you have been tempted to sample the wares via the beta editions you are unlikely to be happy sticking with the old when the licence runs out - you have until spring to decide!


SWPP - Society of Wedding and Portrait Photographers
The Society of Photographers
Clwyd Chambers, Clwyd Street, Rhyl, Denbighshire, LL18 3LA, UK
Tel 00 44 (0) 1745 356935
Home Page - Find a Photographer - Benefits of Membership - Events and Seminars - Who's who - Photographic Trade Directory - About - Qualification Structure - Mentor Me Programme - Professional Imagemaker Magazine Articles - FREE information pack - Privacy