articles/Software/adobelightroom2-page1
Adobe Lightroom 2 - part 1 of 1 2 3 4
by Sean McCormack Published 01/06/2008

Author info
Sean McCormack is a photographer based in Galway, Ireland. He writes for Lightroom News (http://lightroom-news. com) and his own Lightroom blog (http://lightroom-blog. com). He's currently writing a Lightroom book for GMC publications and tech edits for Adobe Press.
Introduction
In my previous article I covered getting basic corrections with Quick Develop, and getting files to clients for selection. Once you've got the list of selected files, it's time to get them processed for final output. Here we'll just touch on some basic processing and retouching in Develop. Whole books have been written about Develop/Camera RAW processing, so I don't have space for everything!
Lightroom 2
At 9pm PST on April 1st, Adobe launched a public preview of Lightroom 2. This is a 'kick the tyres' version to let people see what will be coming in version 2 when it is finally released. No date has been announced, but the preview expires on Aug 31st for registered users of Lightroom 1. Otherwise you can either use it as a 30 day trial, or get a Lightroom 1 user to invite you for the duration of the preview. Go to http://labs.adobe. com/technologies/lightroom to get a copy for yourself. One of the key additions to Develop in the new version is Local Corrections, which we will touch on here, because they are not only useful for dodging and burning, but for basic beauty retouching.br>
And in the Left cornerFig 1. The Develop Module
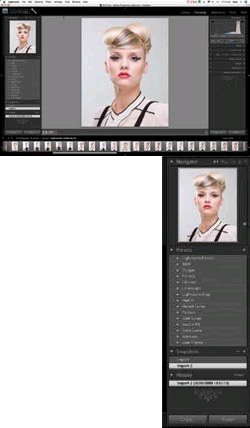
Fig 1. The Develop Module
The first thing to do is have a look at Develop in general, before getting down to the nitty gritty of individual tools. On the left hand side of the screen, we have the Left Panel. At the top we have the Navigator Pane. This gives us a preview of the current photograph, along with the area zoomed into (if you are zoomed in). When you hover over a Preset, this window will give a preview of how the photograph will appear, with the Preset applied.
Fig 2. The Left Panel

Below the Navigator we have the Presets Pane.
Initially there are 2 folders: Lightroom Presets and Users Presets. As you can see from the picture I've created a large number of folders of my own Presets for better organisation. To create a Preset, click the + beside Preset and choose a folder (or create a new one) and the settings you want to save, then name it and hit create!
Next up is the Snapshot Pane. In this pane we can make a record of the current settings in our image, to make it easier to get back to that point. Snapshots are stored in the XMP Metadata, which means that they get transported with the file if it's copied to another machine (if it's a RAW file, you need to copy the associated XMP file with it). To create a Snapshot, click the + icon beside the name Snapshot. The text will be highlighted, so give it a name that reflects the appearance. This will make it easier to find, whenever you come back to the photograph again.
Snapshots are useful for keeping variations in a shot as you work with it. You could have numerous Black & White, Sepia, High Contrast, etc, versions of the image stored as Snapshots. The main difference between a Snapshot and a Virtual Copy, is that Virtual Copies are treated as separate images, with their own preview. You can of course create a Virtual Copy from a Snapshot easily. Simply select the Snapshot, Right Click(or Control Click on Mac) on the photograph and choose 'Create Virtual Copy...'
Fig 3. Creating a new Snapshot.
The final pane is History. As with Photoshop History, this is a linear record of steps you've created. The history here is not the same as the Undo history (Control/Command Z), as the Undo history also includes steps within Lightroom (eg changing Modules).
You can step back in to the history to any point and Lightroom will recreate the look at that point. You can't, however, remove an individual step, but the work done in that step is visible and you can simply do a new step with the opposite settings to reverse it.
The Clear command to the right of the Pane allows you to wipe the list of steps in History. This doesn't bring you back to the start. The photograph will remain as it was at the time of clearing history. To go back to the start, use the 'Import' Snapshot in the Snapshots Pane.
Tucked in at the bottom of the left panel are the Copy and Paste buttons. Clicking Copy will open a dialog asking which of the current settings you wish to copy.
Fig 4. The Copy Settings Dialog
You are currently on page 1 Contact Sean McCormack
1st Published 01/06/2008
last update 09/12/2022 14:50:55
More Software Articles


