articles/Software/adobelightroom2-page2
Adobe Lightroom 2 - part 2 of 1 2 3 4
by Sean McCormack Published 01/06/2008

Here's a interesting quirk in the Beta, if you Check all, the Local Corrections will be copied, but if you select Check None, and then tick all the boxes, they won't. It just a warning not to use Check all if you don't want your dodging and burning, etc, to be copied across. The Paste button just puts the copied settings onto the current file.
Going to the Dark Side
Well, not quite, but the other side rather, which is referred to as the Right Panel. This is where we process the photograph. The tools here are similar to what you'll find in Camera RAW.
Rather than going over boring descriptions of how a tool works, we'll jump into examples.
Fig 5. The Right Panel
Fixing Exposure Issues
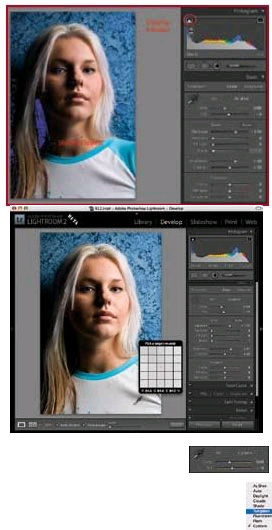
Fig 6. Our sample image
Levels Probably the first exposure tool that people learn to use in Photoshop is the Levels tool. While there is no direct levels tool, it's easy to set the black and white point in Lightroom. The two things we need to change are Exposure and Blacks. Exposure sets the white point of the image, while Blacks sets the black point. These can be accessed via the Basic Pane or via the Histogram. I'm going to use the Histogram. First up I hover around the Histogram until the text on the bottom left of it reads Exposure (usually in the middle). I then click and drag to the right to bring the exposure up to the desired point. Looking at the Histogram, we can see that the display looks like a mountain, our goal is to have the toe of the mountain just touching at either end of the histogram, giving a full range of tones. In our sample image, I've stopped shy of the edge, because there is nothing super-white in the photograph and the image was shot to be slightly dark (although this was an initial image, and the in camera exposure was subsequently corrected). (If the image was overexposed in small areas but the tonal balance was otherwise fine, I'd use the Recovery section to bring the highlights back)
Fig 7. Fixing Exposure by clicking and dragging in the Histogram.

In the sample image, there is quite a build up of tones in the shadow regions. Detail in the shadow areas is not as critical as highlight detail, but I think it's a little lacking here. Rather than gauging visually how much clipping is occuring I'm going to use the clipping indicators. These are the triangles on the top left and right of the Histogram. Hovering over them will show a temporary view of the image areas that are clipping - blue for the shadows and red for the highlights. Clicking on the triangle will make the view sticky.
In this image, I'm not going to get rid of all the clipping as I want the image to retain some darkness. Again I click and drag in the histogram, this time in the Blacks section. Moving the blacks to 1 looks right here, and still has some areas of complete black.
Fig 8. Changing the black point using the clipping indicator.
As a final tweak I'm going to boost the brightness control slightly. Brightness in Lightroom is designed to change the midpoint, but protect the shadow and highlights from clipping. It's not the same as pre-CS3 Brightness in Photoshop, which could do serious damage to a photograph.
White Balance
The White Balance of an image can be changed in Lightroom. Often it can be good to mix the automatic modes with a manual tweak to get the final look.
Fig 9. The White Balance control in the Basic Pane of Develop
Looking at Fig 9. we can see the two main sliders that give us control of White Balance. These are Temperature and Tint. Temp erature controls how cool or warm the photograph is, while Tint controls the green/magenta balance of the image. Besides manually controlling these, there is also a drop down menu of presets as per Fig 10. These are the presets available to RAW (or DNG) files. Formats with no internal White Balance info (like JPG) have As Shot, Auto and Custom only.
Fig 10. The White Balance selection menu
The preferred method of dealing with White
balance is to use the eyedropper. Activate it by clicking on the icon, or with the 'W' shortcut key. If we look at Fig 11. we can see some controls associated with the tool. In the Toolbar under the photograph, we can see Auto Dismiss, Show Loupe and Scale. Auto Dismiss decides if the tool closes when you click on the photograph. If you are trying a number of points to get the best white balance, I recommend leaving it on. Show Loupe shows the grid visible beside the cursor, while Scale lets you zoom for tighter control. To use the tool click on an area in the photograph that is neutral toned (e.g. black, grey or white). When an area is neutrally toned, the RGB values should be the same (although points of a percent in difference is usually acceptable)
Fig 11. The White Balance Eyedropper tool in operation
Please Note:
There is more than one page for this Article.
You are currently on page 2 Contact Sean McCormack
1st Published 01/06/2008
last update 09/12/2022 14:50:55
More Software Articles


