articles/Software/adobelightroom2-page3
Adobe Lightroom 2 - part 3 of 1 2 3 4
by Sean McCormack Published 01/06/2008

Bear in mind that the eyedropper will be neutral white balance and that after you may need to tweak it visually (make sure you have a calibrated monitor though!) to warm it up. While not technically correct, warmer photographs are usually preferable to the client!
Contrast Control with Curves
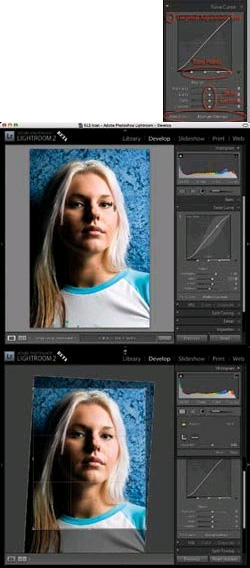
In the Basic Pane we have a contrast slider, which is great for quick fixes, but not especially good for accurate control. The slider basically applies or removes an S curve as you increase or decrease the amount. The Tone Curve lets you get much more control in the contrast of a photograph.
Fig 12. The Tone Curve
The Tone Curve in Lightroom can be controlled in a few ways: via the Sliders, on the actual Tone Curve graph and on the image using the Targeted Adjustment Tool (TAT).
To activate the TAT, click on the target icon on the top left of the Tone Curve Pane.
Mouse over to the photograph and click and drag up (or down) to increase (or decrease) the tones in that area. Similar tones in photograph will also be affected. Even with the TAT selected, you can also use the sliders or click and drag on the graph. Press ESC to close the TAT.
Fig 13. Using the Targeted Adjustment Tool (TAT)
The two other things that can be changed in Tone Curve are the Tone Points and the Point Curve. The Tone Points set where the change between each slider happens. So to have only the deepest shadow affected by the Shadows slider, pull the first tone point over to the left more. If you examine the tones on the bar the Tone Points rest on, you'll notice the shading to the left and right of each point reflects the areas the point affects. The final control, situated on the bottom, is the Point Curve. Normally there are three options here: Linear, Medium, and Strong Contrast. These set the start point for the Tone Curve.
Currently, other Points Curves can only be created in Camera RAW (or by hand-editing a Preset).
The Tool Strip
Originally in Version 1, there were a number of tools in the Toolbar. Some of these have now moved to the Tool Strip, situated below the Histogram.
The reason these were moved was space was too tight to expand the controls in the future, so a move was deemed necessary. Contained in the box for the beta release are Crop, Spot Removal, Red Eye and Local Corrections Brush.
Cropping
Click on the Crop icon, or use the shortcut key 'R', to active the Crop tool.
Either draw a crop manually on the photograph or drag the edges and corners to create the crop. You can change from a landscape to a portrait (or the other way around) by selecting a corner and dragging off at 45 degrees until the orientation changes. To change Aspect Ratio, select a new one from the Crop Pane.
Fig 14. Cropping in Lightroom

To straighten, move the mouse back slightly from a crop corner and the cursor will change to the rotate cursor. Then click and start to drag. A grid overlay will appear, allowing you a reference to straighten against. You can also hold down the Control Key (Command on Mac), whereby the cursor will change to a ruler. Click on a suitable start point (eg on the horizon), then drag to the second point. When you're ready, release the mouse and Lightroom will apply the angle you've just measured.
Red Eye
While the bulk of pro photographers work hard to avoid any red eye, it happens from time to time. To use this tool, simply click the icon and drag the ellipse over the offending eye and release. Lightroom does the rest.
Beauty Retouching with Spot Removal and Local Corrections Being tight for space, I'm only going to cover this in brief. Thorough retouching should really be done in Photoshop, but for basic retouching, Lightroom is more than capable.
Spot Removal
While Spot Removal was intended for removing dust spots from sensors, you can also do blemish removal with it. Select the Heal tool and change it to a suitable size (use the [ and ] keys as shortcuts). Click on a spot and release. Lightroom will auto hunt and find a similar area to copy from. If you're not happy with the result, either delete the spot (by hitting the delete key) or drag the circle from where Lightroom has chosen to a more suitable place.
Keep going until you've removed as much as you deem necessary. Using a small sized brush you can even remove lines under the eyes (Fig 16)
Fig 16. The complete spot removal
Negative Clarity Brush
In version 1, Clarity (in the Basic Pane) provided a way of increasing midtone contrast. Now with version 2 we have negative Clarity, where by we can decrease it.
Fig 17. Selecting Clarity in the Brush tool Pane
Click on the Brush tool in the Tool Strip. Select Clarity in the Paint drop down menu (Fig 17). Change the Effect Amount to -100. Set the brush to about 25 while zoomed into 1:1 view. Set the Feather to 50 to give a soft edge. For this I leave the flow at 100. If you want to be more subtle, use a lower flow and build up the effect. Now brush over the skin only. Hover over the pin to see where you've brushed. When you're done, use the Amount slider to increase or decrease the effect.
Fig 18. Brushing on the photograph.
Please Note:
There is more than one page for this Article.
You are currently on page 3 Contact Sean McCormack
1st Published 01/06/2008
last update 09/12/2022 14:50:56
More Software Articles


