


articles/Monitors/calibrationeternalproblem-page3
by Tom Lee Published 01/02/2001
We now open the Adobe Gamma program, which can be found in the Windows Control Panel. I have found it useful to create a shortcut to the desktop and access it from there with Photoshop open at the same time.
You will be presented with an option for using either the wizard or going directly to the control panel. Choose the latter option, although either will do the same job. When the Control Panel opens up, go to the top window.
This is the name of the ICC profile currently in use. If you have associated a monitor profile as described before, this will be the one in use and should not need altering. Adjust the brightness and contrast using only the monitor controls, close down adobe gamma and move to the printer section of the setup.
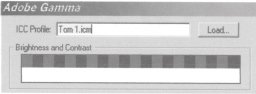
Assuming we did not load a specific ICC monitor profile, highlight it and give it a new name, Tom 1.icm or something else appropriate. We are now going to create our own profile.
The next box below is the brightness and contrast box. Using the monitor controls only, adjust the screen to its maximum contrast, then adjust the monitor brightness down until you can only just see the grey squares next to the black ones in the box. The white strip underneath the grey and black boxes should still be white.
Next we adjust the phosphor box. There will generally only be two selections to make here, either Trinitron or P22-EBU. If you are unsure if your monitor is a Trinitron tube, choose the other one. P22-EBU is a generic choice, which will suit most other makes of monitor.

In the Gamma box there is a check box allowing the choice of viewing single gamma.
Uncheck it and three boxes (red, green and blue) will be presented. VERY CAREFULLY adjust the sliders until you are sure that the black and white part of your sample image gives a good range of greys (without any colour cast) and that the colours in the other parts of your image give a pleasing result.
You may find that they do not need much tweaking, if any at all. In the "Desired" selection box, choose Windows Default (or Macintosh Default) depending on your operating system.
The "White Point" settings can be chosen from the drop down boxes. Remember the RGB Setup gave us a White Point of 6500°K, This can now be inserted. The Adjusted white point can be left Same as Hardwere.
Click OK, and the program will ask you if you want to save your changes. Click Save and most of the hard work is over with.
What we have just done is created a custom made profile for our MONITOR. This interprets the IMAGE profile so that what we see on screen is a pretty accurate rendition of how the computer "sees" the image. It does not change the data in the image, so we can change the MONITOR profile at any time and it will not affect the image data..... Happy?


SWPP - Society of Wedding and Portrait Photographers
The Society of Photographers
Clwyd Chambers, Clwyd Street, Rhyl, Denbighshire, LL18 3LA, UK
Tel 00 44 (0) 1745 356935
Home Page - Find a Photographer - Benefits of Membership - Events and Seminars - Who's who - Photographic Trade Directory - About - Qualification Structure - Mentor Me Programme - Professional Imagemaker Magazine Articles - FREE information pack - Privacy