


articles/Photoshop/colourcorrectioncurves-page4
by Mike McNamee Published 01/02/2007

The graph shows the deepest black that can be acheived with various combinations of paper and ink. The image on the right mimics the clogging up of the shadows. Printing a grey scale and then examining it by eye with reference back to the image will tell you which RGB values are too dark to be differentiated from their neighbours in the scale.
Gamut Warning
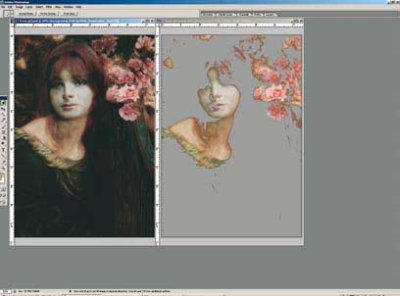
Photoshop provides a way of displaying the colours in an image, which will not print accurately because they are "outof- gamut". By default the gamut warning displays the outof- gamut colours for the CMYK workspace set in preferences. However, if a Proof Colours profile is active, the gamut warning is specific to that profile. This enables the viewer to set and compare a number of profiles, which can assist in the selection of the print media or settings. In the screen grab, the two views show the gamut warning for Epson Somerset Enhanced and Epson Premium Luster, both with PhotoBlack inks in an Epson 7600. The Premium Luster delivers all colours in the image, the Somerset struggles throughout. It should be emphasised that this does not imply that the Somerset is an inferior product, the colour accuracy is actually superb; it is just that it does not hold the same depth of black as a semi-gloss paper. It should also be noted that the gamut warning is very conservative and that often the out-of-gamut colour will print very well. For colours which are out-of-gamut due to their saturation being too high, the use of Selective Colour and the Saturation slider will often assist in bringing the colours into gamut.
Rendering Intent
The rendering intent determines how any out-of-gamut colours are to be dealt with by a profile/driver. Perceptual intent shuffles all the colours, maintaining the difference between two out-of-gamut colours. Relative Colorimetric intent moves the out-of-gamut colour to the gamut boundary it there. Two out-of-gamut colours may thus be rendered identically using Relative Colorimetric intent. However for some images, RC produces a brighter result and can be favoured. The image creator is usually the best judge of which intent is rendering the most pleasing image. The gamut warning may be used to assist in the decision.
ADJUSTMENT LAYERS
Adjustment Layers are the method of choice for professional colour correction. They may be made with any of the colour adjustment methods in the drop down menu (Image>Adjust or Layers>Make Adjustment Layer). An Adjustment Layer sits above the image layer upon which it was made and affects all those layers below it by default unless the "Group with previous Layer" checkbox is ticked. Note that this option is not flagged if the icon at the base of the Layers Palette is used to make the Adjustment Layer initially. An Adjustment Layer may be turned on and off like a regular layer using the eyeball icon in the layers palette and is saved with a Photoshop file. An Adjustment Layer automatically has a mask attached to it and this mask may be painted upon like a layer mask, except that instead of hiding the image the masking will prevent or attenuate the effect of the colour adjustment.


SWPP - Society of Wedding and Portrait Photographers
The Society of Photographers
Clwyd Chambers, Clwyd Street, Rhyl, Denbighshire, LL18 3LA, UK
Tel 00 44 (0) 1745 356935
Home Page - Find a Photographer - Benefits of Membership - Events and Seminars - Who's who - Photographic Trade Directory - About - Qualification Structure - Mentor Me Programme - Professional Imagemaker Magazine Articles - FREE information pack - Privacy