


articles/Photoshop/colourcorrectioncurves-page5
by Mike McNamee Published 01/02/2007
An Adjustment Layer has the advantage that it effectively saves the colour adjustment changes but only enacts them when the image is printed or flattened. If you double click on the layer mask icon you retrieve the adjustment and can tweak it without applying two destructive pixel changes. Because colour adjustments are damaging to pixels and do so when a file is flattened for printing, the number used should be kept to a minimum ie do not apply two half strength adjustments - combine them in one Adjustment Layer. In general you should try to keep your adjustments to Levels and Curves and avoid the other methods (although you are at liberty to reject this advice if your adjustments are adequate for your own purposes). The Brightness and Contrast Adjustment, for example, is a linear transformation, affecting every pixel along a tone scale, some of which will be irretrievably clipped.
The Gamut Warning (Ctrl- Shift-Y) greys over those parts of the image which are out of gamut and should be studied in more depth before printing. They may or may not print to your satisfaction.
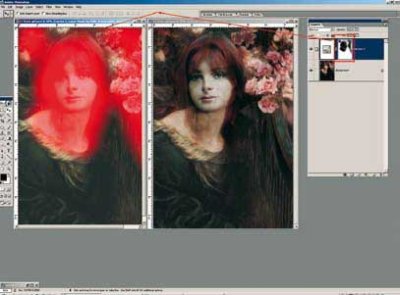
By default, all Adjustment Layers are made with a mask (red surround in diagram). Pressing the backslash key (\) reveals the mask in 'frisket red' by default. The mask prevents the Adjustment Layer changing the image in the masked areas or attenuates the effect if grey is painted on the mask. In this example, the lightening of the dress is confined to that part of the image only, leaving the face unaltered.
Curves are the kings of colour correction sitting at the top of the hierarchy. Their lead over their rivals, Levels, lies in the ability to bend the curve into an S-shape to locally control image contrast, something that levels cannot do. Here it is the curves function provided in Adobe RAW that has been adjusted into an S-shape to enhance the mid-range contrast while leaving the deepest blacks untouched and the sky detail at least partly protected. It does not make this dull shot perfect but it is certainly improved. In the final rendering (for an upcoming feature on filters) we abandoned the sky and found a new one - there is a limit even to curves adjustment.


SWPP - Society of Wedding and Portrait Photographers
The Society of Photographers
Clwyd Chambers, Clwyd Street, Rhyl, Denbighshire, LL18 3LA, UK
Tel 00 44 (0) 1745 356935
Home Page - Find a Photographer - Benefits of Membership - Events and Seminars - Who's who - Photographic Trade Directory - About - Qualification Structure - Mentor Me Programme - Professional Imagemaker Magazine Articles - FREE information pack - Privacy