


articles/Photoshop/flterfactory-page1
by Mike McNamee Published

This is a big topic for users of Photoshop (eg digital imaging). Gone are the days of pulling a remnant of your wife's/lover's black stocking over the optically perfect Nikkor to jigger it up - now you shoot sharp and deal with the consequences later. A quick Google using 'skin softening in photoshop' returned 93,500 hits including a website devoted exclusively to the subject, specialist training course in the topic, DVDs for sale, and countless tutorials from well-intentioned enthusiasts.
Everybody, it seems, has their favourite way of completing this task. The methods do, however, share some common features. These are 'blurring', 'area control' and 'automation'. Within these grouping there are variations:
Blurring
This is the meat of the method. The leading candidates are Gaussian Blur, Surface Blur, Radial Blur, the Dust & Scratches Filter, Median Filter, and Diffuse Glow. Some methods use combinations of filter blurs, layer blending modes and opacity settings.
Area Control
What we mean by this is controlling just where the blurring is to take place. Normally the eyes, eye lashes, lips (sometimes) and hair (sometimes) are protected from the effect of the blurring. The control may be provided by a simple Layer Mask on a blurred layer above the original background, or a complex mask, made from modified colour channels, taken from the image.
Commercial variants of skin softening (there are many), use complex combinations of methods, often with a 'simplified' interface and area control based on skin colour.
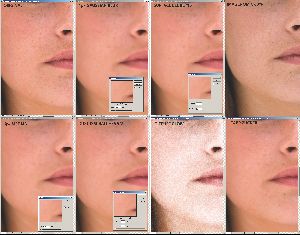
Not that it is going to make things any clearer, we show the various blur methods on the same image. If it shows anything at all, perhaps it illustrates why so many variants are kicking around!
Automation
As soon as the operation involves more than a couple of steps, you should consider writing an action. This saves having to remember just how you did the job last time and is particularly helpful if you only use the technique occasionally and at long intervals. It is also useful because an action does not forget vital steps! Automated methods should be set up to leave the user with a blank Layer Mask arranged so that individual hand painting of the mask may be used for area control.
Decision Time
As with cameras, a bit of research will find you a practitioner making successful and commercial use from any of the options around. You are likely to have more success from sticking with one method for a while and getting a feel of how it responds to different types of complexions, sharpness and skin types. In part, this is necessary because there are an impossibly large number of options to look at as soon as the setting count rises. Take the Tapp-Zucker method as an example. The two layerblending modes are fixed (thankfully!) but the blur values we have found range from 1 to 36 pixels - let's say four variants for example. The opacity could be 10, 20, 30, 40 or 50% for the darken layer and say 40, 60 and 80% for the lighten layer. This already totals 4x5x3 = 60 variants. Add in the differing methods of Gowan and Tapp-Zucker and you have at least 120 possibilities and then throw in Julianne Kost's notion of using Surface Blur and we are up against 240 variants and we have not even started yet! It is little wonder that Tom Lee devised his Radial Blur technique and just sticks to it - never lose sight of the fact that your client is not going to care anyway as long as they look better than life!
One tactic that remains universal is that first explained to the writer by Jane Conner-ziser. With any retouch sub-section of an image, Jane always works with the retouched layer above the original and then drags the opacity of the retouched layer to zero. She then increments the opacity up, viewing at 100% image size, and makes a judgement of the optimum opacity. If a print is then made or you revisit the image another day and decide you have under-cooked or over-cooked the effect, all you have to do is tweak the opacity. If you decide on a different blur level you would be advised to start again, blur on blur can be unpredictable.
The Detail
Assuming that you do not wish to buy-in a bespoke solution, our view is that you are best plunging right in and making an action, with all the sophistication build in, once and for all. Any time you now spend making this action user-friendly, with say keyboard shortcuts, is going to pay dividends every time you use it. In general most of the methods can be worked into an image in a couple of seconds but we timed the actions on a 30Mb file anyway. If you have a hundred images to do then the fact that some methods are five times slower might come into play (although we doubt it). The Imagenomic software can be built into an action workflow and does not strictly compare like with like as the result was the finished article.
Tapp-Zucker 1.7s
Marcus Bell Soft Filter 3.7s
Marcus Bell Signature 1 2.2s
Gavin Phillips Soft 4.4s
Tom Lee Radial Blur 11.4s
Guy Gowan Channel Mask 4.5s
Imagenomic 46.1s*
* this for the complete operation


SWPP - Society of Wedding and Portrait Photographers
The Society of Photographers
Clwyd Chambers, Clwyd Street, Rhyl, Denbighshire, LL18 3LA, UK
Tel 00 44 (0) 1745 356935
Home Page - Find a Photographer - Benefits of Membership - Events and Seminars - Who's who - Photographic Trade Directory - About - Qualification Structure - Mentor Me Programme - Professional Imagemaker Magazine Articles - FREE information pack - Privacy