articles/Lighting/looksatthetest-page2
Lighting for digital Dave Montizambert looks at The Test Part 9 - part 2 of 1 2 3 4
by Dave Montizambert Published 01/04/2009

The aperture setting should provide enough depth of field to keep the test targets and subject in focus. In this test I used the middle aperture on the lens, f11. In this test the camera is set to f11 at 1/60 and the power of the strobe head in the soft-box is adjusted accordingly. The shutter-speed at 1/60 is slow enough for the camera shutter sync with flash or strobe lighting, yet fast enough to overpower the ambient light in my studio. For this test the camera must be set to M for manual rather than any of the auto settings - Program, Auto, Aperture Priority, and Shutter Priority.
As you know I'm all about control and so I am a big advocate of shooting manual with a handheld meter, but if you must shoot using autoexposure modes, shoot your test on manual as described and then go back to your usual auto-exposure setting once the test is done; more on how to integrate the test results with auto settings later.
The ISO setting on the camera to be tested should be set to the sensitivity or ISO you are going to use when shooting. I have selected 100 ISO since that is the ISO I use on this camera 99% of the time. Interestingly enough, you will probably find that you will only need to do the test for one ISO setting and the results will be applicable to all other ISO choices on that camera. If you include a hand-held meter in the test, so that you can check to see if the strobe is emitting the same volume of light each time, make sure that it is set to the same ISO setting as the camera ISO setting. By the way, using a hand-held incident meter to set exposure for the test assumes that you will be manually setting exposure on your camera and that the meter is accurate (see sidebar entitled 'Sunny 16' Test).
'Sunny 16' Test: Here's a quick and dirty test to check the accuracy of your light meter called the 'Sunny 16 Test'- point the dome of your hand-held incident meter directly at the mid-day sun with no clouds between you and the sun, then dial your shutter-speed setting until it matches your ISO setting, if the meter is correctly calibrated it should read f16. If not then adjust accordingly with the plus/minus calibration adjustment controls that most prometers have.

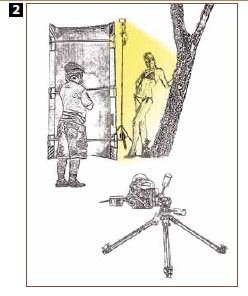
To meter the main-light source, make sure you point the dome of the handheld incident meter directly towards it; the meter's dome should be completely bathed in light from that source of illumination, which means that you will see no shadows on the dome. If it is not pointed directly at the main source of illumination, if instead you are pointing the meter's dome at the camera lens or some other direction, you are going to be averaging the shadow with the main-light rendering incorrect readings that will somewhat over-expose the fully lit subject areas. To control the amount of light striking your test subjects when using flash or strobe, either dial-in the correct brightness with the unit's power variable control, or alter the light's distance to the subject, or use a combination of the two. If you are lighting your test with 'constant light-sources' such as sunlight, open-sky, tungsten, fluorescent, LED, or HMI, you can 'dial in' their brightness for your required aperture by changing shutter speed; remember, the sun doesn't come equipped with a rheostat. Once the lighting is set, check and double check using incident meter readings to ensure that the lighting is even over the Shirley test subjects from edge to edge. Since I am setting my camera to f11 for this test, every incident meter reading I take over the subject area must read exactly f11 - not f8 9/10ths or f11 1/10th, but f11 exactly.
Before I can start capturing my Shirley test images, I set my camera to RAW and I set the appropriate colour or white balance for the set or scene by choosing from one of the pre-sets, or better still, by performing a custom white balance. Even though white balance can be set after capture in your RAW processing software, setting White
I'm A Little Confused
1/3 Stop Exposure Bracket: · 1st Exposure - Set aperture to F16 and fire to capture an image that should be one stop under-exposed.
· 2nd Exposure - Set aperture to f14 (f11 2/3) and fire to capture an image that should be2/3 of a stop under-exposed.
· 3rd Exposure - Set aperture to f12 (f11 1/3) and fire to capture an image that should be 1/3 of a stop under-exposed.
· 4th Exposure - Set aperture to F11 and fire to capture what should be a correctly exposed image.
· 5th Exposure - Set aperture to f10 (f8 2/3) and fire to capture an image that should be 1/3 of a stop over-exposed.
· 6th Exposure - Set aperture to f9 (f8 1/3) and fire to capture an image that should be 2/3 of a stop over-exposed.
· 7th Exposure - Set aperture to f8 and fire to capture an image that should be one stop overexposed.
Please Note:
There is more than one page for this Article.
You are currently on page 2
- Lighting for digital Dave Montizambert looks at The Test Part 9 page 1
- Lighting for digital Dave Montizambert looks at The Test Part 9 page 2
- Lighting for digital Dave Montizambert looks at The Test Part 9 page 3
- Lighting for digital Dave Montizambert looks at The Test Part 9 page 4
1st Published 01/04/2009
last update 09/12/2022 14:56:06
More Lighting Articles
There are 0 days to get ready for The Society of Photographers Convention and Trade Show at The Novotel London West, Hammersmith ...
which starts on Wednesday 14th January 2026


