


articles/Lighting/looksatthetest-page4
by Dave Montizambert Published 01/04/2009

To understand how to work with the findings from a Shirley test, let's suppose that the test revealed that the image capture entitled120 ISO was the optimum exposure rather than the 100 ISO capture. The procedure is, leave the camera set to the ISO that you tested for (in this case 100 ISO) and set the handheld meter to the ISO revealed in the test (in this example 120 ISO). Let me explain further - when you set the ISO on a digital SLR you are setting the sensitivity level for the imaging chip and you are setting the sensitivity of the in-camera meter at the same time, they cannot be separately controlled. But this is okay when you use a hand-held meter because you ignore the readings of the in-camera meter anyway - this is assuming your camera is set to manual. If you have to use in-camera meter readings instead of hand-held meter readings (ie for travel shots), then you should still set your camera to 100 ISO and then compensate for the discrepancy (1/3 of a stop in our example) with the plus/minus, over-/under-exposure compensation on your camera (see Image 6). This is also how you should work if you are using Auto, Program, Shutter Priority and Aperture Priority modes since they rely on the in-camera meter.
Now I'm Really Confused
ISO Test Brightness - backwards from reality: In our Sensitivity Test, the darker exposures represent higher ISOs and the lighter exposures lower ISOs. Since this is somewhat confusing let's take a close look at how it really works. If both meter and camera are set to 100 ISO and we manually set the camera's exposure (camera set to M for manual exposure) to the hand-held meter reading captured at the subject plane, let's say f11 at 1/60, we should theoretically be able to capture a correctly exposed image of our Shirley test set-up. If, however, the camera is out of whack, then our exposure of the test will appear wrong. If, for instance, the image appeared a little too bright in this f11 at 1/60 exposure, we would be able to tell by how much by looking at the other exposures and finding the one that places the middle grey swatch at 114 or 94 levels. Let's say that happens to be the exposure taken at f12 (f11 1/3). F12 allows 1/3 of a stop less light into our cameras than does f11. This handy bit of information tells us that this camera/hand-held meter combination needs 1/3 of a stop less light for a correct exposure. To allow a 1/3 of a stop less light into your camera using ISO means you need to work with a higher ISO setting on your meter. In our example stated above, set the meter to 120 ISO instead of 100 ISO. Believe me this is much easier than having both meter and camera set to 100 ISO and then having to transpose each reading in your head before setting on your camera. Setting the meter to 120 rather than 100 ISO is telling the meter that the camera has a higher sensitivity to light and so doesn't need as much light for a correct exposure. So this is why the higher ISOs (120 to 200 ISO) are represented in our series of test images as darker exposures and why the lower ISOs (80 to 50 ISO) by lighter exposures.
If I needed to shoot at a higher sensitivity for low light conditions, say 400 ISO, then I would set my camera to 400 ISO and my meter to 420 ISO. Or...for in-camera metering, camera set to 400 ISO and the plus/ minus compensation to minus 1/3.
Just to make sure you really got it, suppose that the fifth exposure labeled 80 ISO was the optimum exposure in the test, you should then set your camera to 100 ISO and the hand-held meter to 80 ISO. For in-camera metering, set your camera to 100 ISO and the camera's plus/ minus exposure compensation feature to plus 1/3.
And that is all there is to creating a sensitivity test - in less than 30 minutes you can perform this test and by doing so will have eliminated one large variable in a field of infinite possibilities plus you will have an optimal RAW file to create the perfect pre-set for automating RAW processing. In retrospect I guess I could have created a more interesting Shirley if I used a bikini-clad Shirley and I could have explained to offended parties that we need the flesh tone, a lot of it, as much as we can get... and getting back to Hawaii, it seems I will have to go back to shoot some more in April due to last trip's cloudy weather. Oh well, we all have our crosses to bear.
Dave Montizambert
Dave Montizambert lectures internationally on lighting, digital photography and Adobe Photoshop. He is also a published author having written two books on lighting and digital photography (publisher Amherst Media) plus numerous magazine articles on these topics in North America and in Europe. Dave also creates Photoshop tutorial CDs & DVDs for www.software-cinema.com. Dave is available for lectures and workshops in your area and can be reached at montizambert@telus.net or www.montizambert
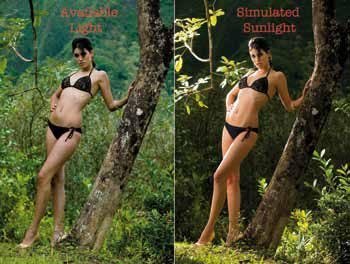
If you would like to learn more about creating simulated sunlight for those overcast days, check out Dave's book on lighting called, Creative Lighting Techniques, available through Amherst Media and the SWPP bookstore


SWPP - Society of Wedding and Portrait Photographers
The Society of Photographers
Clwyd Chambers, Clwyd Street, Rhyl, Denbighshire, LL18 3LA, UK
Tel 00 44 (0) 1745 356935
Home Page - Find a Photographer - Benefits of Membership - Events and Seminars - Who's who - Photographic Trade Directory - About - Qualification Structure - Mentor Me Programme - Professional Imagemaker Magazine Articles - FREE information pack - Privacy