articles/Photoshop/p1background-page3
Part One - Background - part 3 of 1 2 3 4
by Mike McNamee Published 01/04/2005

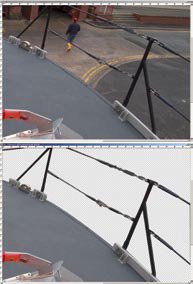
DIFFICULT: Non-organic, mechanical objects are often best masked with geometric marquee tools or paths. Here complicated paths were drawn and then used to make a softened mask.
Cut it out!
One of the most frequent questions at technical seminars is how to cut out people and place them elsewhere or alternatively how to change the colour or image in a background. It is a question for which many different answers may be advanced. However a common thread is that it is a masking technique above all else. We start here but will continue the topic in part two.Layer Fundamentals
First of all you need to understand about Photoshop layers. A layer is made "available" (that is active) by clicking on it in the Layers Palette. A layer may contain pixels of given colours or pixels may be transparent. When transparency is present it is represented by a light grey and white checkerboard pattern. If only a single layer is visible (ie its eye is set to visible) then this chequered pattern shows through in the main image window. However if a transparent cluster of pixels stands above another layer then the pixels of that lower layer show in the gaps. It is also a fundamental property of a layer that it can be moved up and down in the layer stack and also in the vertical and horizontal positions within the image. When pixels move out of view in Photoshop, to the edges of the image window, they are stored as "Big Data" and will be saved with a Photoshop psd file. The big data is only lost if the image is cropped, flattened or saved in an inappropriate format such as JPEG.
Cut-out Options
Our preferred method of effecting a cut-out is to use a Layer Mask and when doing so, to make a mask, initially, without any feathering of the edges. This can then be softened under highly controlled conditions at a later stage, and differentially around the image, should that be required. Having elected to use this tactic there are still options available for starting off the process

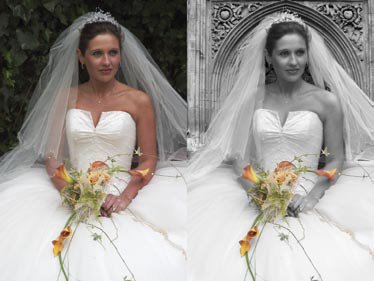
DIFFICULT: The bride is removed from the background and placed before a cathedral door using Extensis Mask Pro. Additional layers in Screen Mode were used to bring the brightness of the veil back to the correct value for the new background. The soft mask to leave the bouquet in colour was made by brushing with a Wacom Pen and tablet using a Hue Colour Adjustment Layer.
The starting point of a cut-out is always to make a selection. In terms of simplicity there is a working list which runs something like this:*
• Select with a geometric marquee tool such as the Rectangular Marquee.
• Select with the Magic Wand.
• Select with magic wand on a channel.
• Use the tools of the Select menu such as Color Range.
• Select with Magic Wand on a modified channel (either modification by contrast change or mode change).
• Use the Extract Tool.
• Select with the Magnetic Lasso Tool.
• Select with the Lasso Tool.
• Use of the Pen Tool.
* Note that other users may have a slightly different order of play. The position of the Lasso tool so low in the list reflects the difficulty of following contours with a freehand tool. This is much improved by the use of a graphics pen and tablet but remains a tricky process.Having made a selection there are a number of ways of modifying it to improve the fit of that selection to the subject. These are of two types, one to refine the edges (eg Blurring, Expanding) and one to refine the shape, usually by a transformation process. Many of these second generation modifications are performed on Layer Masks, alpha channels or the Quick Mask.When all else fails or you get fed up exercising what can be considerable skills, you can get your wallet out and pay for a specialist cut-out program such as Extensis Mask Pro or Corel Knockout.
Please Note:
There is more than one page for this Article.
You are currently on page 3
- Part One - Background page 1
- Part One - Background page 2
- Part One - Background page 3
- Part One - Background page 4
1st Published 01/04/2005
last update 09/12/2022 14:57:15
More Photoshop Articles


