


articles/Photoshop/p1background-page4
by Mike McNamee Published 01/04/2005
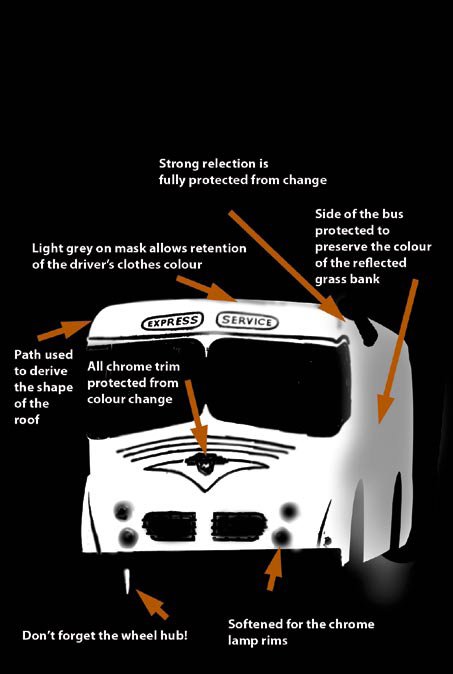
Anatomy of a Layer Mask
The annotated mask shown (left) was that used to change the colour of the bus paintwork. An HSB Adjustment Layer was used with the colourise button checked. This would have colourised the bus and the reflections of the surroundings. To prevent this, a 25% grey was applied as a gradient to the side of the bus to allow only part of the colour change to contaminate the reflection. Where the reflection was particularly strong, the mask density was increased to 100% black to prevent any colour shift. The outline of the bus roof was broken by the reflection of the driver and the Magic Wand could not be used to select for that part of the mask. Instead a path was drawn to accurately reproduce the top of the roof - man-made objects such as this are often better outlined with the Pen Tool using just a couple of points.
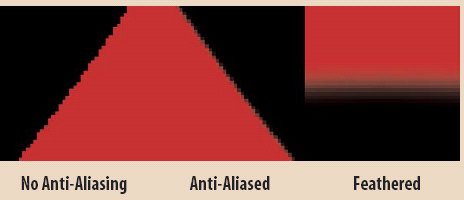
Going Soft at the Edges
The realism of a montage is controlled by correct lighting, perspective and the quality of the transitions between introduced elements and their background. There are three types of edges anti-aliased, not anti-aliased and softened. Aliasing adds transitional pixels to detected edges made from marquee tools and is switched on by default. It is not the same as feathering a transition which softens it. In most uses the anti-aliasing is left switched on. The edges at the transition of montaged elements may be adjusted by use of sharpening and blurring tools and, for maximum, control by adjusting the levels of the mask (in the same way as you would adjust levels of the image itself).
Leave the Eraser in its box!
For almost all conceivable masking and compositing tasks it is better to use layer masks to "hide" the unwanted portions of an image rather than erase them. If you hide them under a mask you can reveal them by painting the mask with a white brush. If you erase, your only route to recovery is through the history palette, which may be way too late at the end of a long task. If your technique involves using the Extract Tool, this erases unwanted parts by default. Get around this by extracting on a copy of the subject layer, then making a mask from the extracted layer and using this as a layer mask on the original. Now you can use all the mask refining techniques downstream.


SWPP - Society of Wedding and Portrait Photographers
The Society of Photographers
Clwyd Chambers, Clwyd Street, Rhyl, Denbighshire, LL18 3LA, UK
Tel 00 44 (0) 1745 356935
Home Page - Find a Photographer - Benefits of Membership - Events and Seminars - Who's who - Photographic Trade Directory - About - Qualification Structure - Mentor Me Programme - Professional Imagemaker Magazine Articles - FREE information pack - Privacy