


articles/Software/p4blightroomfilter-page1
by Art Suwansang Published 01/09/2010
The Localised Adjustment tools, in Lightroom, allow photographers to expand their creative freedom beyond global image adjustments. This tool was originally released in Lightroom 2 and as a further refined tool in Version 3. In the previous issue, I discussed the basics of the localised adjustment brush and demonstrated a few creative scenarios and ideas. Now it is time to learn more about the graduated filter tool and how it can be used to enhance your images in quick and amazing ways.
The graduated filter tool was designed to mimic the behaviour of the various gradated gelatin or glass filters that fit in front of a lens to modify the light that enters the camera. These filters can control exposure, or correct for colours shifts, from certain parts of the image. The most popular and well known of these filters is the graduated neutral density filter, which is coated to allow variable light transmission. It is widely used in landscape photography to balance a bright sky exposure with a darker foreground.
The graduated filter in Lightroom functions in a similar fashion as the physical lens filter, however, there are more creative tweaks that can be applied using some imagination. When an exposure is made using the traditional filters, the effects that the filters produce remain permanent in the exposed image. With the digital tool, and a normal exposed image, any type of filter effects desired may be added, removed or replaced with entirely new effects, giving you more room for creative inspiration.
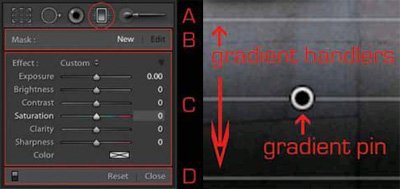
Graduated Filter Settings and Control
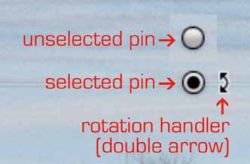
The graduated filter is located in the 'development module' on the right-hand panel. It is the fourth icon from the left in the Localized Adjustment tools panel. Once the tool is selected, the panel, with control parameters for this filter, will expand. On the top of this expanded panel is the Mask control; the option here is to create a new mask or modify an existing one. Below it is the effects presets and adjustment sliders. The effects preset is where you can load previously saved adjustment sets or create a new graduated filter preset for later use. Immediately below this you will find the usual adjustment sliders starting from exposure, brightness, contrast, saturation, clarity, sharpness, and colour. Here's a quick tip, to quickly reset any of the sliders back to default, just double click on the slider's name. Finally below these adjustment sliders on the left side is a switch used to toggle on, and off, all of the graduated filter effects, a 'reset' button to remove all of the filters, and 'close' button to dismiss this adjustment panel when you are finished using the tool. See figure 1 for a visual the break down of the panel.


SWPP - Society of Wedding and Portrait Photographers
The Society of Photographers
Clwyd Chambers, Clwyd Street, Rhyl, Denbighshire, LL18 3LA, UK
Tel 00 44 (0) 1745 356935
Home Page - Find a Photographer - Benefits of Membership - Events and Seminars - Who's who - Photographic Trade Directory - About - Qualification Structure - Mentor Me Programme - Professional Imagemaker Magazine Articles - FREE information pack - Privacy