


articles/Software/p4blightroomfilter-page3
by Art Suwansang Published 01/09/2010
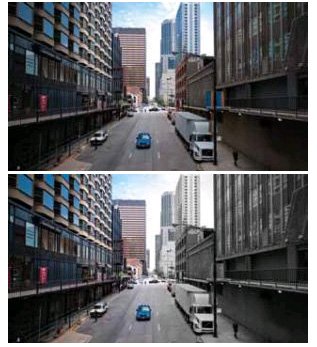
Scenario 3: Sky Enhancements and Colourisation
The past two scenarios represent basic enhancement where only one adjustment is used to create the effect; let's now focus on the intermediate principle where more than one adjustment is can be combined to create unique and stunning gradients. In this case, I'll use the image in figure 7a, in which the sky looks dull and void of life. I'll put more emphasis on the sky and clouds by applying the following set of adjustments: First - darken the overall sky by decreasing the exposure to about -1.00, and increase the contrast to +100; since the sky is almost void of colour, let's enrich it by increasing the saturation slider to approximately +67. Finally, bring more definition to the clouds by increasing the clarity slider to +100 and sharpness to +67. Remember that these adjustment values are approximate guidelines and a starting point to apply your own effects. The exact values will vary based on the image that the effects are being applied to.
Once all the slider values are set, the gradient can then be applied to the image. Since I only want this effect in the sky area, I'll start at the top of the image, click, hold, and then drag the gradient downward so that the anchor pin and centre white line is close to the top of the silo in the image. The result is a dramatically better image shown in figure 7b. If additional enrichment is desired, another graduated filter may be added to the same general area, as in figure 8. Remember to decrease the intensity of each adjustment slider every time you apply more than one graduated filter over the same area to avoid overdone effects.
Applying the same technique that transformed the sky in the preceding image, the effect can easily be modified to enrich a gloomy white sky by adding a colour cast to it. The image in figure 9a was shot on a cloudy day and the sky in this image looked plain and washout. To enhance the sky, I have darkened it by decreasing the exposure setting to about -1.00 and bumped up the contrast to +58. I don't want to saturate any of the existing colour in the sky, so I'll leave the saturation at the default 0. I also like to add more definition to the clouds by increasing the clarity to +100 and the sharpness to about +46. Finally, I will add a light yellow-gold colour cast to enrich the sky by selecting the colour from the colour effect palette (figure 10). Once all of the values are set, the gradient can be applied by dragging the cursor from the top of the sky area, down toward the top of the building, seen in figure 9b. Voila! This makes an amazing transformation to the overall image.


SWPP - Society of Wedding and Portrait Photographers
The Society of Photographers
Clwyd Chambers, Clwyd Street, Rhyl, Denbighshire, LL18 3LA, UK
Tel 00 44 (0) 1745 356935
Home Page - Find a Photographer - Benefits of Membership - Events and Seminars - Who's who - Photographic Trade Directory - About - Qualification Structure - Mentor Me Programme - Professional Imagemaker Magazine Articles - FREE information pack - Privacy