


articles/Software/p4blightroomfilter-page2
by Art Suwansang Published 01/09/2010
Once all of the adjustment sliders are set to the value desired, you can then apply the graduated filter to the image. To do this simply click and hold over the area where you want the effect to first appear, then drag the effect out in the direction that want it to gradate. While you apply the effect, if you move your mouse around, you can effectively change the direction of the gradient. Remember, this tool always begins with your adjustments effect and then fades to the base image. The edge of the gradient can be controlled during the initial application, or afterwards, with the gradient handlers shown in figure 2. A quick tip here: if you press and hold onto the 'Shift' key when applying the gradient, the effect will snap to a straight line, either horizontally or vertically.
Multiple gradients may also be added to an image, and gradients may be applied on top of each other as well. To perform any adjustments to previously applied gradients, click on the individual pin (shown in figure 3) to activate it. Once active, you can modify the effect by dialling up and down the various adjustment sliders; click hold and drag on the pin, moving the position of the gradient; change the width and edge transition of the effect using one of the two gradient handlers; rotate the angle of the effect. To rotate, hover the pointer over the centre white line next to the pin and when the double pointed arrow appears (figure 3), you can drag the line around to change the angle of the effect.
Now that you know how the tool functions, let's move on to its creative uses. I'll outline a few scenarios and ways to work with them using the graduated filter tool. Some of the scenarios are selective burning, selective colour fade to create a time capsule effect, enhancing and darkening the sky; colour correction and removing unwanted colour, and applying a Lens Baby effect to any images.
Scenario 1: Graduated Burn
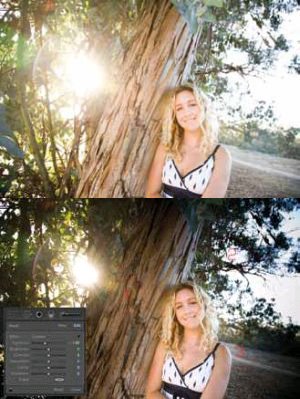
First up is selective burning. For this scenario, I have a portrait that is too bright and could use some localised luminance control. There are three areas in this image that need darkening: the left side of the frame to the tree bark, along with the top and lower right corner of the frame. To darken these strong highlights, I would dial down the exposure slider to about -1.00 and then apply the graduated filter. In this case I would apply three separate gradients in the areas identified above.
Scenario 2: Colour Fade (Time Capsule Effect)
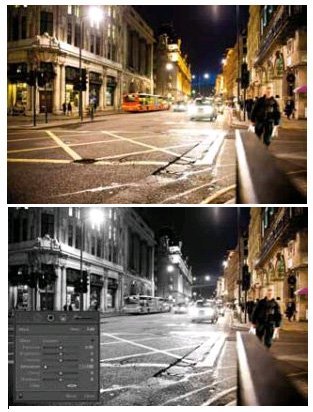
Next up is colour fade to create a time capsule effect. Part of this effect is in black and white, which represents the past, and it slowly fades to colour, which is the present. The principle behind this effect is very similar to the first scenario. The saturation slider is adjusted instead of the exposure slider. Simply lower the saturation slider all the way down to -100. In most cases this effect looks best vertically, so when I apply the gradient, I press and hold the 'Shift' key so that the gradient remains straight and vertical as I drag it out


SWPP - Society of Wedding and Portrait Photographers
The Society of Photographers
Clwyd Chambers, Clwyd Street, Rhyl, Denbighshire, LL18 3LA, UK
Tel 00 44 (0) 1745 356935
Home Page - Find a Photographer - Benefits of Membership - Events and Seminars - Who's who - Photographic Trade Directory - About - Qualification Structure - Mentor Me Programme - Professional Imagemaker Magazine Articles - FREE information pack - Privacy