


articles/Photoshop/photoshoppaint-page1
by Jane Conner-ziser Published 01/06/2010
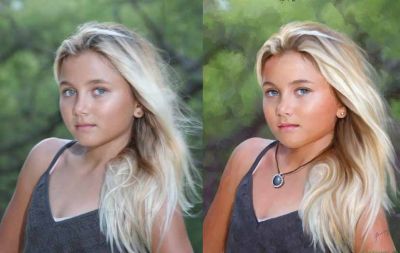
Wow! CS5 came out smoking with new features and new ways of doing things! One of the most talked about features is the new Mixer Brush Tool. Nested with the Brush Tool in the vertical tool bar as the bottom option, it can be used with both the new Bristle Tip brushes and the standard Static Tip brushes. For the first time, Photoshop offers a means of blending colours beyond Smudging whether you want to paint from scratch or combine paint with photography.
When youchoose the Mixer Brush you will immediately notice new options available for it.
From left to right the options are:
Tool Presets. There are some presets included that can be loaded by accessing more options from the upper right corner and selecting Mixer Brush Tool from the drop-down menu, or you may prefer making your own once you become familiar with the way the brushes work.
Next is the option bar's shortcut to the Brush Presets where you can adjust the size and softness of brushes or load other brush collections.
The third option is to hide and show the Brush Panel (or Palette).
The next three options are brand new:
The colour square shows the current brush load (red). If you choose to 'clean' the brush from the drop-down menu, the square will empty to let you know that there is no colour currently on the brush and it will behave like a blender. This allows you to add colour, then blend it without having to change brushes. In addition, the drop-down from the colour square provides the option to Load Solid Colors Only. If this option is on, when you sample colour from an image (Opt or Alt tap), it will load a solid colour based on the settings for the Eyedropper Tool. When Load Solid Colors Only is not selected, the sample from the image allows for loading the brush with multiple colours.
You can also choose to automatically reload a brush after every stroke, or automatically clean the brush after every stroke, by selecting from the two options just right of the current brush load icon.
CS5 even includes useful brush option combinations in the next dropdown menu that help you jumpstart into painting. These choices were created using the options for Wet, Load, and Mix and are listed under the Custom option.
Make your own combinations by adjusting these options yourself:
Wet = how "wet" the existing paint on the canvas is. A dry canvas will show a lot of the selected colour being applied. A wet canvas will immediately begin blending existing colour into your applied colour. As the wet setting increases, the amount of paint picked up from the canvas while painting also increases. A Dry brush will not pick up paint while painting so no mixing is involved. A Wet setting with no colour loaded on the brush allows blending of existing colours.
Load = how much paint you have in the brush, or how long your colour will last in a stroke. High loads last longer than low loads.
Mix = how much the colour on the canvas blends into the colour being applied. Low mix settings pick up less paint from the canvas so more of the colour being applied will show. High mix settings will not be as pure because the picked-up paint will fully cover the brush.
Flow = how fast the paint comes off the brush. Visually it looks like opacity. High flow gives a lot of paint at one time. Low flow layers it on more slowly.
The next option is to choose whether or not to use the airbrush option. This option gradually continues to build colour as if you were using a traditional airbrush.
Sample all layers allows you to create your painting on a New Layer instead of working directly on the background. Many artists who paint from photographs like to paint on layers so they can refer to the original image when needed. Artists who paint from scratch often like to work on layers so they can back up when they need to or make image adjustments to specific parts of the painting during the painting process.
The final option is for letting the tablet pressure determine the size of the brush, over-riding settings in the Brush Panel. This means that if you apply light pressure the brush is small; harder pressure makes the brush larger. This settings override option is not available for the Bristle Tip Brushes.
The above new options are available for all brushes in Photoshop.
And there's MORE!


SWPP - Society of Wedding and Portrait Photographers
The Society of Photographers
Clwyd Chambers, Clwyd Street, Rhyl, Denbighshire, LL18 3LA, UK
Tel 00 44 (0) 1745 356935
Home Page - Find a Photographer - Benefits of Membership - Events and Seminars - Who's who - Photographic Trade Directory - About - Qualification Structure - Mentor Me Programme - Professional Imagemaker Magazine Articles - FREE information pack - Privacy