articles/Monochrome/themonochromeissue-page7
The Monochrome Issue - The Output Options - part 7 of 1 2 3 4 5 6 7
by Mile McNamee Published 01/04/2006

Dodging & Burning - Bit Depth
It is one of the ironies of digital imaging that those of us who specialise in quality issues (colour and image) spend our time imploring people to shoot RAW, stay within a single colour space at all times and avoid jpegs, etc - all on the grounds of avoiding pixel decimation. In the next breath the demands of composition call for the image to be darkened around the edges, blurred, glowed, burned in there, held back here, all of which produce untold amounts of pixel damage.
The whole business is thus a matter of compromise. In a wet monochrome darkroom dodging and burning is absolutely routine, almost universal. If that fails to get the job done, out comes the ferri! The whole business was best summed up by a deceased friend of mine (who I think got the quote from a guy called Bill Hurst) namely, "print it how you wished it had looked not how it did look". Paul Gallagher discusses the dodge and burn topic later, but the main difference between wet chemistry dodge and burn and Photoshop is the undo button, or, even better, the use of Adjustment Layers.
A general rule though is that going back and forth should be via the History Palette, multiple undo or Adjustment Layers - plain dodging following by burning is a complete no-no; indeed you are best to avoid the Dodge and Burn tools altogether!
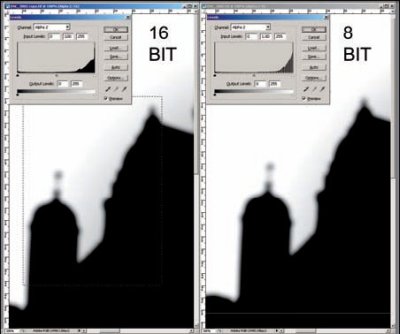
This leads naturally to that old chestnut, 16-bit or 8-bit as your starting image mode? The pro 8-bit camp says that you cannot see the difference in the printed image. However there is an argument that if you are going to beat the heck out of the pixels you are best to start with more bit depth so that you have more editing leeway for pixel degradation. The combined screen grab shows histograms of masking channels from an image, manipulated in 8-bit and 16-bit.
The missing data in the 8-bit histogram of the alpha channel is revealed by the "gappy" histogram in just the same way that you see gaps in the histogram of the image pixel data. Such deficiencies ring alarm bells and things are likely to worsen if you start to adjust the alpha channel by greyscale clamping and choking.
One outflow from this discussion is that you are no worse, but likely to be better, from deriving your mono image from a RAW file, desaturated and opened in 16-bit. To keep some perspective on this issue, if your images do not show any problem at the size you print them then stay with 8-bit. Reprocess any difficult images as 16-bit on an as-needed basis.
Eliminating Posterisation
This bit is robbed more or less directly from Ben Wilmore's book, Photoshop CS Studio Techniques (Adobe Press). Given that you have ended up with posterisation, in spite of the precautions you have taken, here is how to get rid of it. Bear in mind it is quite a slow process. Set your Magic Wand to a tolerance of zero and click on a posterised area. The low tolerance is just the ticket for posterisation, which, by definition, is a reduced number of tones. Then click Select>Modify>Border and use a setting of 2 for slight posterisation, 4 if it is heavier.
The apply Gaussian Blur to smooth out the area. You have to go all over the image doing this, which is why it is painstaking (and only feasible for really important shots!).
Please Note:
There is more than one page for this Article.
You are currently on page 7
- The Monochrome Issue - The Output Options page 1
- The Monochrome Issue - The Output Options page 2
- The Monochrome Issue - The Output Options page 3
- The Monochrome Issue - The Output Options page 4
- The Monochrome Issue - The Output Options page 5
- The Monochrome Issue - The Output Options page 6
- The Monochrome Issue - The Output Options page 7
1st Published 01/04/2006
last update 09/12/2022 14:59:44
More Monochrome Articles


