articles/Printers/advancedblackandwhite-page3
Printing Using Epson's Advanced Black and White Driver - part 3 of 1 2 3 4 5
by Paul Gallagher Published 01/04/2009

The Results
Our findings are as follows:
1. Using ABW produced a deeper maximum black, averaging a Dmax around 2.50 compared with 2.22 obtained using full colour and Epson's Pro3800PLPP profile. This difference in density is not detectable by eye, indeed, to most viewers, all densities lower than around 1.8 or 1.9 (a Lab value of about 12%) look the same. This is also true if you look at the Kodak Q13 test patches - in all but the strongest light it is difficult to separate the shadow end of the scale.
2. Use of ABW at all tone settings darkened the print by between 5% and 20% Lab lightness units. The effect was even and progressive from Lighter to Darkest. The 'fullcolour profiled' print gave the most linear response and provided the print which best matched the original, both statistically and visually.
3. Metamerism was slightly improved by the use of ABW, although this was a difficult feature to improve upon because K3 UltraChrome has good metameric characteristics anyway.
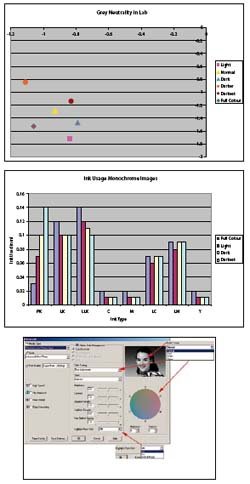
4. Print neutrality was visually identical in all ABW versions even though the spectrophotometer detected some small differences at around the 0.5 ΔE mark. The full colour version of the print was slightly greener in natural, north daylight by a just detectable amount. Any of the prints would be regarded as 'acceptably neutral' by most observers.
5. The ink usage was in accord with what we expected from the discussions on the way the ABW driver works, namely a reduction in the use of full Cyan and full Magenta. Full colour used less Black but more of all the other inks. In the ABW set, the total ink used rose as the prints became darker.
6. Overall the full colour version was the best visual match between a calibrated screen and the print. It was also statistically more correct. This is not the same thing as saying it was the preferred print outcome. Some viewers would prefer the slightly increased drama brought on by the Dark setting, especially to the sky. We guess that most viewers would find the print made on Darkest setting too dark. All this is conjecture, however! The entire image was almost mid-toned, ie of average density. The histogram in Photoshop reported an overall luminance equivalent to 122.24 RGB points, an 18% grey patch is usually placed at 120 RGB points for a Gamma 2.2 image. Other images with different key (ie a higher key landscape) might be preferred with a different interpretation and factors such as image size and display conditions would have an influence. The upshot of all this discussion is that our findings point to the use of Lighter as the preferred setting (in most cases) but some experimenation may be needed, on a case-by-case basis, for really critical printing.
Please Note:
There is more than one page for this Article.
You are currently on page 3
- Printing Using Epson's Advanced Black and White Driver page 1
- Printing Using Epson's Advanced Black and White Driver page 2
- Printing Using Epson's Advanced Black and White Driver page 3
- Printing Using Epson's Advanced Black and White Driver page 4
- Printing Using Epson's Advanced Black and White Driver page 5
1st Published 01/04/2009
last update 09/12/2022 14:50:56
More Printers Articles
There are 0 days to get ready for The Society of Photographers Convention and Trade Show at The Novotel London West, Hammersmith ...
which starts on Wednesday 14th January 2026


