


articles/Software/lightroomadjustmentbrush-page1
by Art Suwansang Published 01/10/2010
The release of Lightroom 2, in 2008, generated great excitement in the digital community over the improvements made to the functionality of the program through the introduction of Localize Adjustment Tools. In Lightroom 3, these tools remain, for the most part, unchanged with some minor improvements to the user interface and usability, most notably the disappearance of the less intuitive button mode.
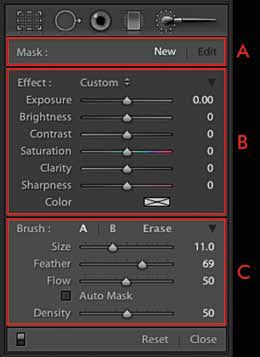
Since these tools have been around for quite some time, being able to understand and use them creatively can be very crucial to the overall workflow. The Localize Adjustment Tools panel (fig.01), located below the histogram in the development module on the right panel, contains from left to right: the crop, spot removal, red eyes correction, graduated filter and the adjustment brush tools. In this article I would like to focus attention to the adjustment brush.
When the adjustment brush tool is mentioned, the first use that comes to mind is dodge and burn. While this type of adjustment is at the top of the list, the tool itself is much more functional. For instance, this tool can perform selective colouring on black and white (step-by-step article in Professional Imagemaker, June-July 2010 issue), localised colour correction, skin softening, eye enhancement, adjust the definition of contours and much more.


SWPP - Society of Wedding and Portrait Photographers
The Society of Photographers
Clwyd Chambers, Clwyd Street, Rhyl, Denbighshire, LL18 3LA, UK
Tel 00 44 (0) 1745 356935
Home Page - Find a Photographer - Benefits of Membership - Events and Seminars - Who's who - Photographic Trade Directory - About - Qualification Structure - Mentor Me Programme - Professional Imagemaker Magazine Articles - FREE information pack - Privacy