


articles/Software/lightroomadjustmentbrush-page4
by Art Suwansang Published 01/10/2010
Next, I needed to dodge the couple, just a touch, so that they stand out, especially their faces and skin tone. To do this, I started at the top of the brush panel by clicking on new to create a new mask and then I reset all of the slider settings. For this part, both of their skin tones correspond to the mid-tone area, so I used the brightness slider and set it to 100. As for the brush, I zoomed in and used a smaller brush with soft feather, and set the flow to about 50 along with the density and painted carefully over them; coming back to make further adjustments as needed. The before and after of this adjustment can be seen in figure 05.
Scenario 2: Localize Color Correction
For the next image, let's use the brush tool to perform colour correction. To properly utilise this tool you must develop a basic understanding of the colour wheel and know the opposite, or complementary, colour (I've included a colour wheel in figure 07 for reference). When correcting for any colour cast, generally select the direct opposite of that colour on the colour wheel.
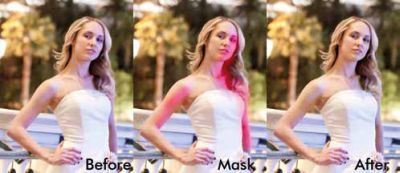
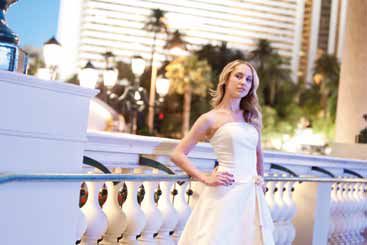
The portrait in figure 08 was taken in a mixed lighting condition, where the right side of the bride's face shows a strong purple-magenta colour cast compared to the normal skin tone. Using the colour wheel to find the opposite colour to purple-magenta, I would simply draw a straight line starting at purple-magenta across the centre of the circle the colour that is opposite it. It's that simple, in this case the colour would be a light green - yellow tone. Bare in mind that there is no exact formula for the colour, it is the best approximation. Using the brush tool for this adjustment, I would click on the 'colour' box in the effect panel and pick a light green-yellow colour from the colour tray (fig. 09). As for the brush setting, a moderate brush size with high feather for a softer edge effect would be best. For this situation I like to slowly and gradually paint in the effect. I set the flow at about 60 and the density at about 50, where I can return later to increase or decrease the brush density. A close-up of the before along with the mask and final effect can be seen in figure 10.


SWPP - Society of Wedding and Portrait Photographers
The Society of Photographers
Clwyd Chambers, Clwyd Street, Rhyl, Denbighshire, LL18 3LA, UK
Tel 00 44 (0) 1745 356935
Home Page - Find a Photographer - Benefits of Membership - Events and Seminars - Who's who - Photographic Trade Directory - About - Qualification Structure - Mentor Me Programme - Professional Imagemaker Magazine Articles - FREE information pack - Privacy