


articles/Software/lightroomadjustmentbrush-page5
by Art Suwansang Published 01/10/2010
Scenario 3: Skin Softening and Eye Enhancement
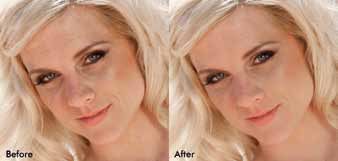
With the third demo, I would like to soften the bride's skin texture in figure 11 and at the same time perform a little eye enhancement on her. Let's start off with the skin softening and consider what adjustments sliders to use. For this, I started out with the contrast slider, by reducing the contrast just a minute amount to lower the contrast or tonal differences between the highlight and shadow of the skin texture. Next, I adjusted the clarity slider to the minus side but not to -100 because too much effect is applied and it will not look good. Finally, the last adjustment that I made here was with the sharpness slider. By reducing the sharpness, I smoothed out the skin texture. Now, I moved to the brush setting, and set the brush to the appropriate size and feather, in this case I wanted a really soft brush edge so I used a high feather value. Start with a moderate to high flow and mid-range density. Keep in mind that you can always adjust the settings and apply more brush strokes. The settings for the rush can be seen in figure 12, with the final result; and a close-up of the before and after in figure 13.
Finally for eye enhancement, I used a similar principle, that is popular in the retouching industry, by lightening the iris of the eyes on the opposite side of the key light. To achieve this, I used the brightness slider (the iris falls on the mid tone range) increasing it to the desired amount and then increasing the contrast slider, just a touch, to add a bit more contrast to the iris. At this point I can increase the clarity and sharpness by a very small amount as well, but it is not entirely necessary. An illustration of the settings and brush can be seen in figure 14. To finish, zoom to the eye area and use a small brush with soft feather size to about the iris itself and paint in iris on the opposite side of the key light; a low flow and density may be used here to gradually build up the effect. A close-up with before and after can be seen in figure 15 and the overall finished image in figure 16.


SWPP - Society of Wedding and Portrait Photographers
The Society of Photographers
Clwyd Chambers, Clwyd Street, Rhyl, Denbighshire, LL18 3LA, UK
Tel 00 44 (0) 1745 356935
Home Page - Find a Photographer - Benefits of Membership - Events and Seminars - Who's who - Photographic Trade Directory - About - Qualification Structure - Mentor Me Programme - Professional Imagemaker Magazine Articles - FREE information pack - Privacy