


articles/Software/lightroomadjustmentbrush-page2
by Art Suwansang Published 01/10/2010
Adjustment Brush Settings & Control
When the brush icon is chosen on the panel it expands, giving photographers a wide variety of control through choices. The panel is broken down into three parts - the mask, the effect and the brush - each controlling a different aspect of the tool. The mask (fig. 02A) enables you to either create a new mask, in this case a new brush, or edit existing ones. The effect (fig. 02B) contains pre-sets, along with various adjustment sliders, and a colour effect selector. The adjustments in this case include exposure, brightness, contrast, saturation, clarity, sharpness and colour. Lastly the brush (fig. 02C) controls the parameter of the brushes where users can pre-define two brushes (designated A and B) and the Erase Brush. The controls for the brush include: size, feather (brush edge softening), flow, auto mask and density.
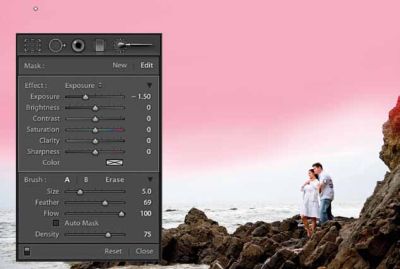
The brush control for size and feather is fairly simple to understand. When the brush hovers over the image and the feather is enabled, users will see an inner circle that represents the brush size and an outer circle that displays the brush feather range. The flow controls the amount of paint or how wet the brush is when applied to the image. Auto Mask is a smart edge-detection algorithm; when enabled, it allows for an extremely quick masking or paint process by automatically detecting edges of any objects using colour, contrast and luminance information from the image. The density slider acts as a brush capacity limiter and in some ways behaves similarly to the opacity control in Photoshop. For instance, if the exposure is set to +1, flow to 100 and density to 50, the effective exposure for that area would max out at +. 5, and not continue to build up as in Photoshop.
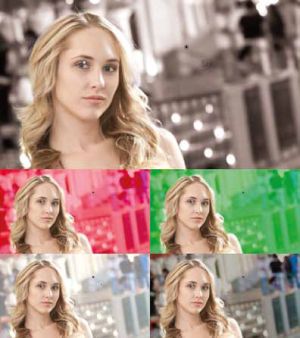
The brushes in Lightroom are parametric adjustments (sets of instruction). Lightroom will add an anchor point or button to accompany every new brush (fig. 03); generally, it appears where the brush is first applied to the image. When the mouse hovers and stays over any of these anchor points, a mask will appear (fig. 04). The mask by default is red, however, the colours may be changed to green, white or even black (which can be confusing to view) by pressing Shift + O. It can also stay on permanently by pressing the ' O' key to enable it in real-time. All of these can be accessed through the menu Tools > Adjustment Brush Overlay. When an anchor point is selected (fig. 03A) it will have a black dot on the inside meaning changes can be made to the effect sliders and the brush mask itself. It will display grey (fig. 03B) when not selected and no changes can be done.


SWPP - Society of Wedding and Portrait Photographers
The Society of Photographers
Clwyd Chambers, Clwyd Street, Rhyl, Denbighshire, LL18 3LA, UK
Tel 00 44 (0) 1745 356935
Home Page - Find a Photographer - Benefits of Membership - Events and Seminars - Who's who - Photographic Trade Directory - About - Qualification Structure - Mentor Me Programme - Professional Imagemaker Magazine Articles - FREE information pack - Privacy